


Floral alphabet embroidery looks fancy on a wall, but the first hoop often ends in a tangle: the letter disappears under the flowers, the transfer smudges, or the stitches pucker the fabric. Most beginners do not need more talent. They need a design that keeps the letter readable and uses only a handful of easy stitches.
This guide gives you 19 easy alphabet embroidery designs with flowers and leaves, each one built for a first or second project. My first hoop was a lopsided A for my sister, and the daisies hid every wobble. Every design below names its stitches, thread count, hoop size, cost, difficulty, and time, so you can pick one tonight and finish it this weekend.
- Outline the letter first, then add flowers at the edges so the initial stays readable.
- Five stitches cover all 19 designs: back stitch, lazy daisy, French knot, stem stitch, and satin stitch.
- A 6 inch hoop, linen or tight cotton, and 3 to 6 skeins of floss handle most projects for under $10.
- Trace with a water-soluble pen or transfer paper, and test your marks on scrap fabric first.
- Keep needles, pins, and small embellishments away from babies and toddlers.
How to start your first floral letter
Pick one letter, not a whole name, for your first hoop. A single initial in a 6 inch hoop takes about 2 hours and teaches every skill a longer name needs. Print the letter in a plain block or serif font at the size of your hoop, then trace it onto linen or tightly woven cotton with a water-soluble pen or transfer paper. Dark fabric calls for chalk transfer paper instead, since pen lines will not show.
Hoop the fabric drum tight, with no sag in the center, and keep it tight while you stitch. Work the letter outline first in back stitch, then add stems in stem stitch, petals in lazy daisy, flower centers in French knots, and leaves in satin stitch or fishbone stitch. Use 3 strands for outlines and 2 strands for small petals so the flowers sit lighter than the letter. Press the finished piece from the back with a warm iron, trim the fabric, and back the hoop with felt.
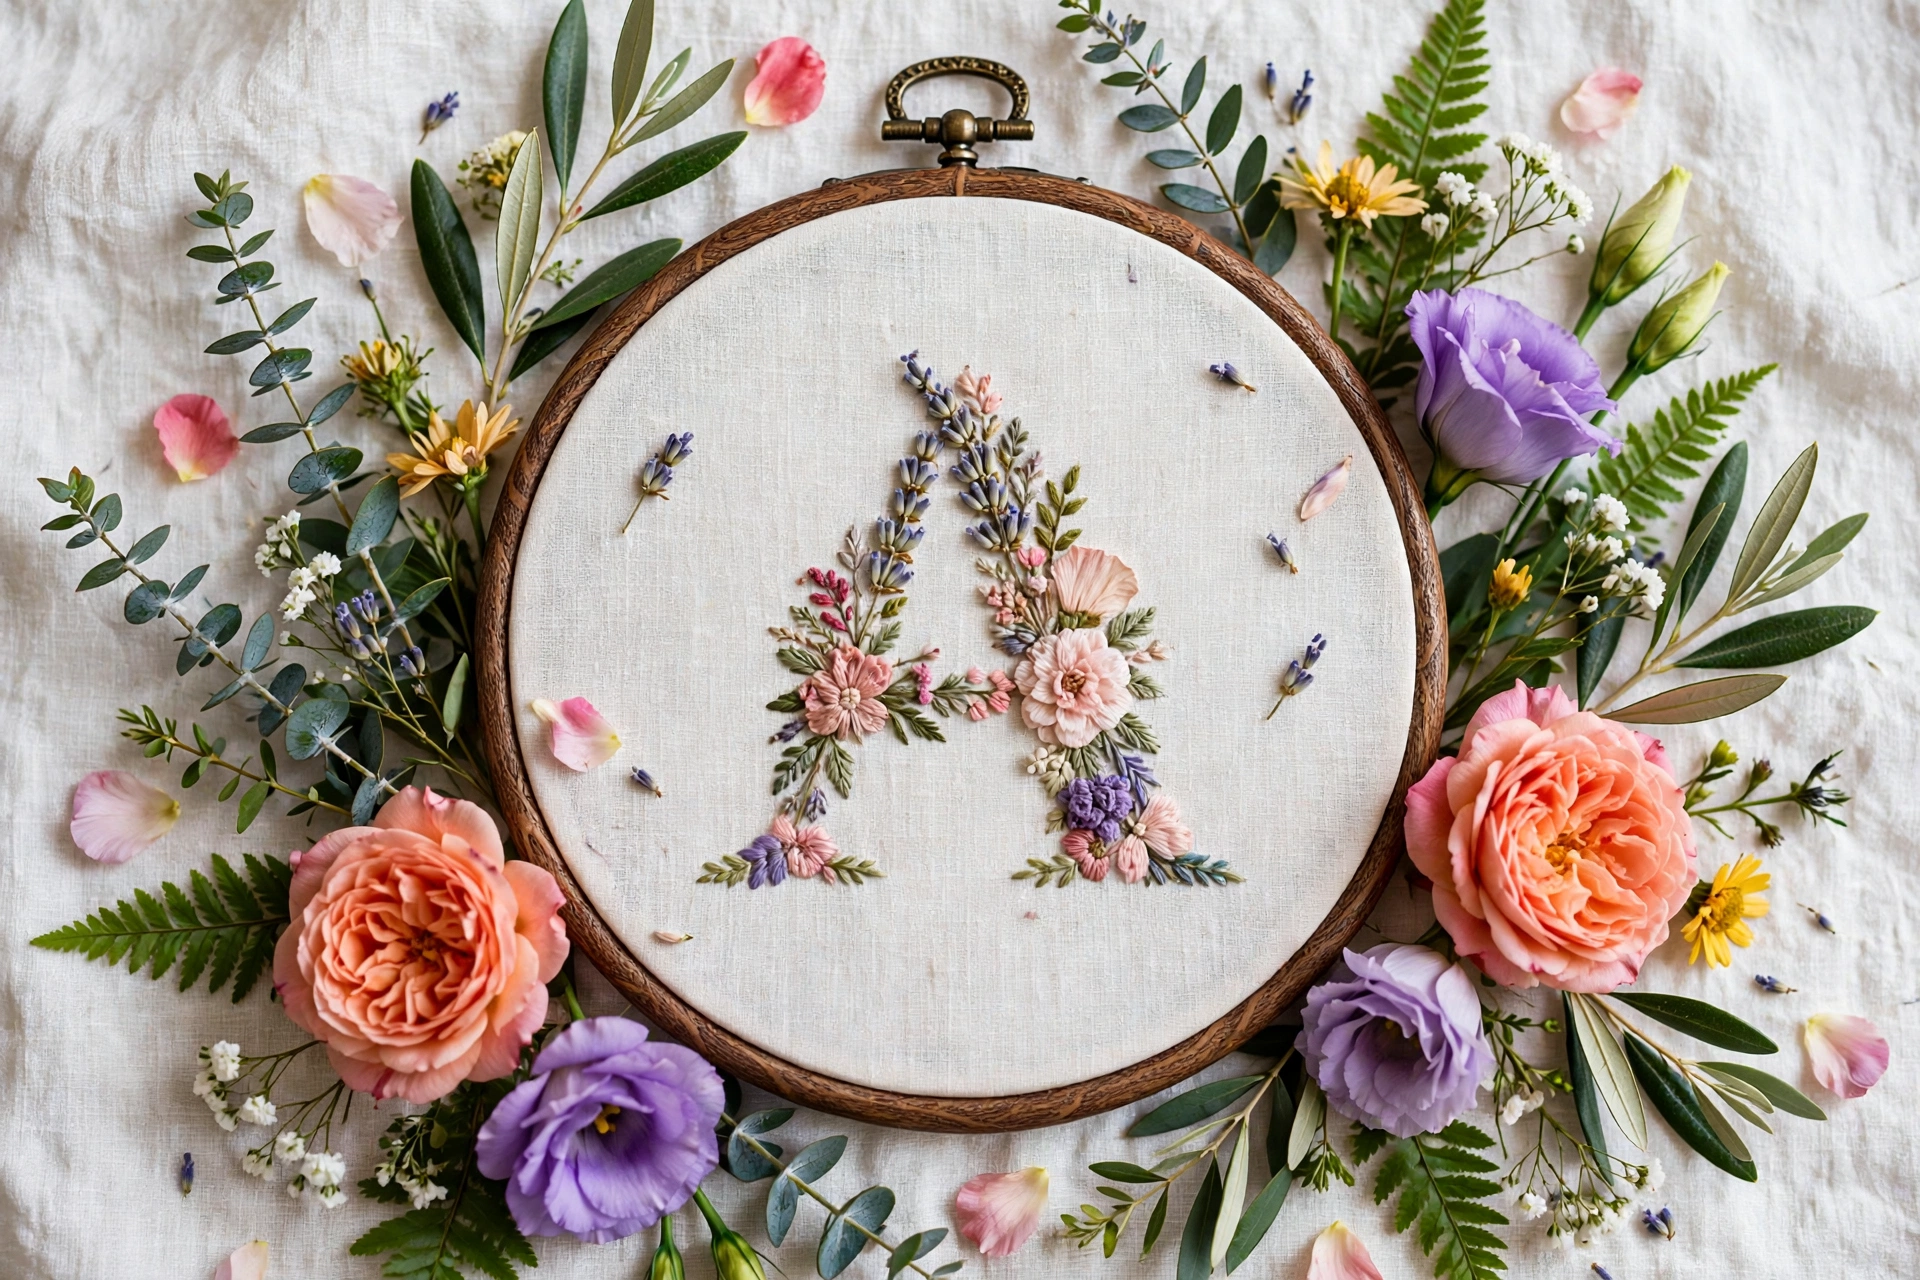
1. Daisy chain initial
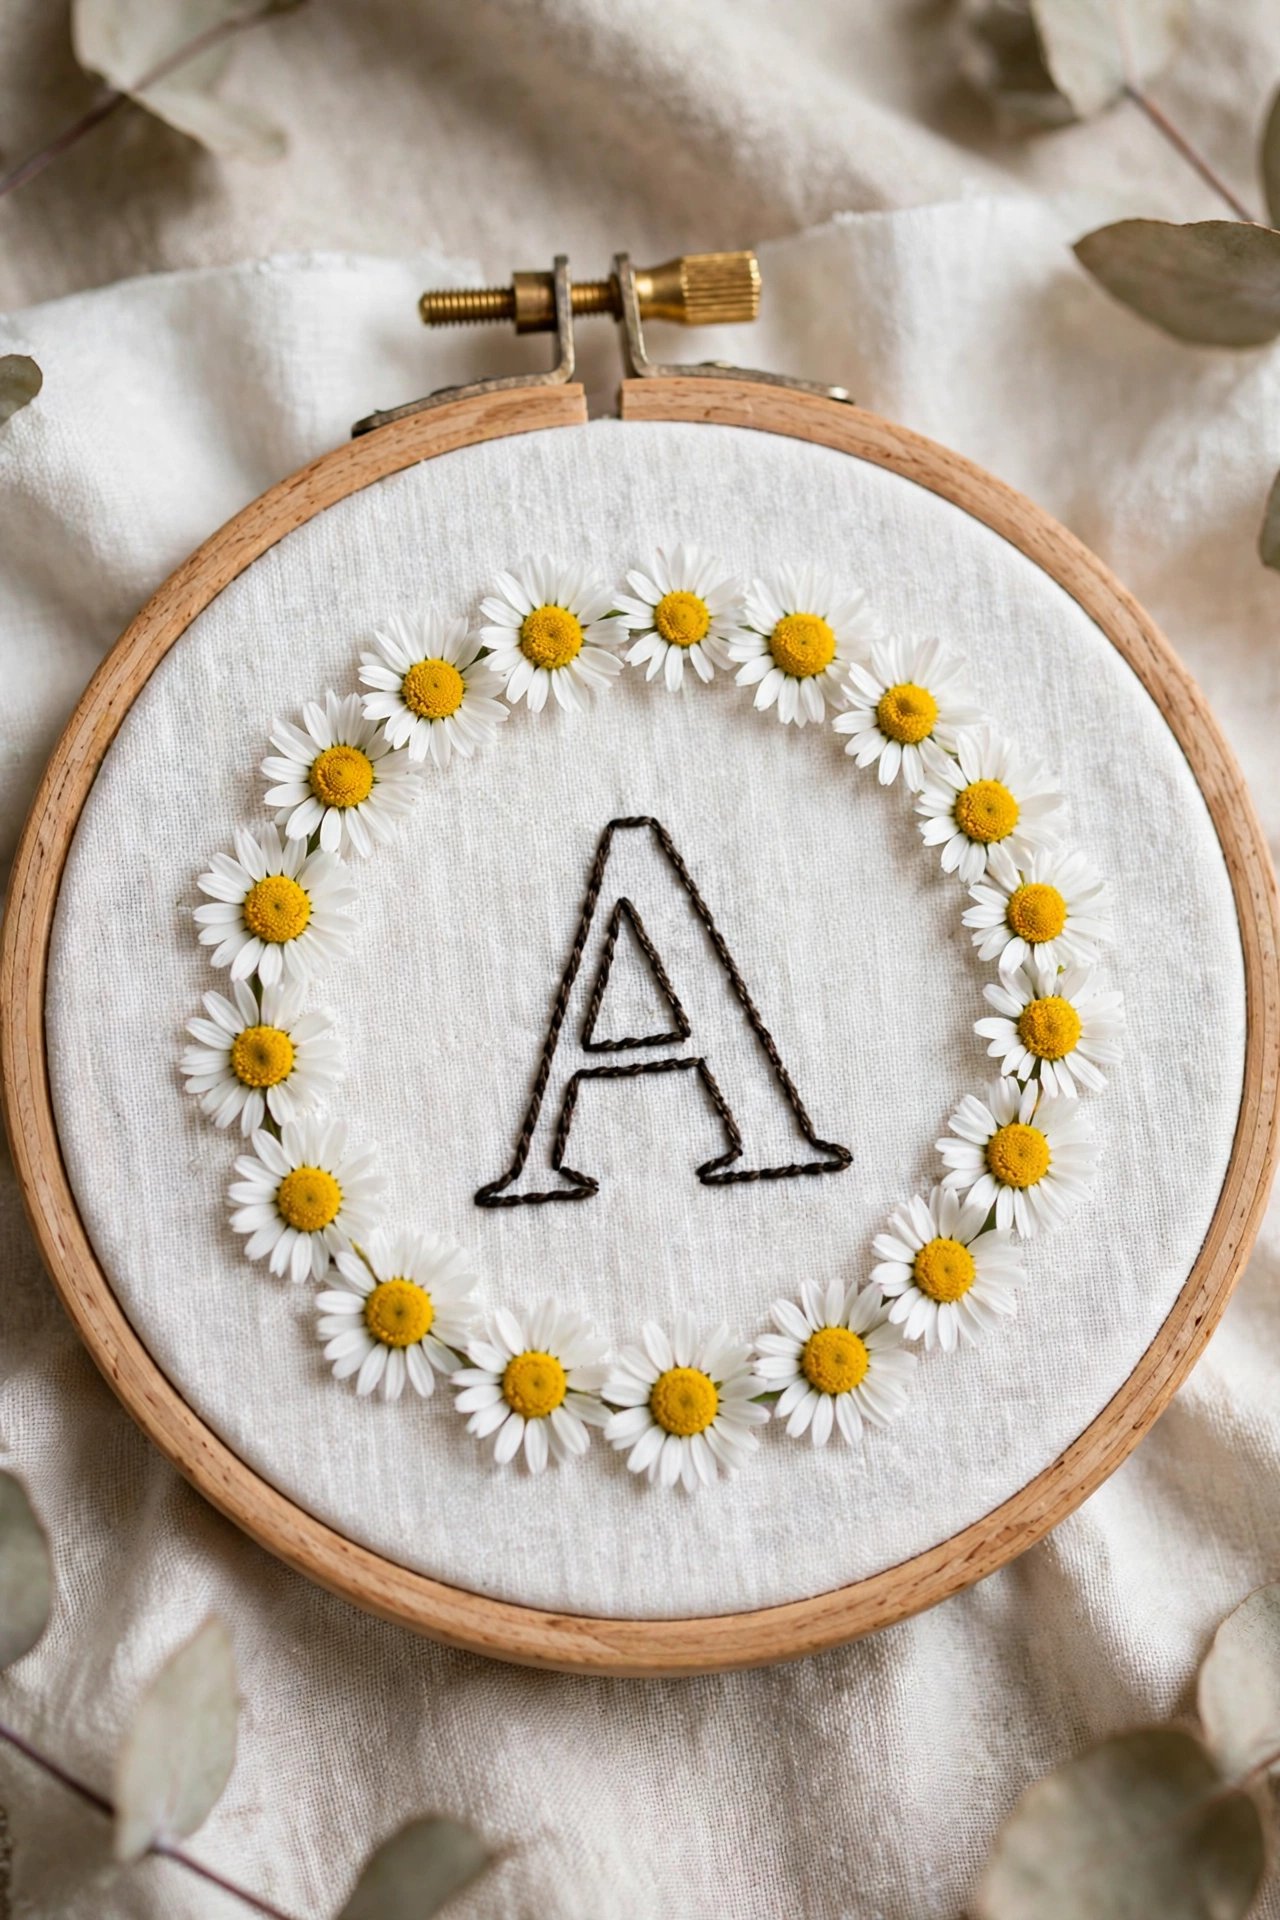
Outline a block letter in back stitch on white linen, then ring it with lazy daisy petals in white floss and yellow French knot centers. Keep the petals outside the outline so the letter stays easy to read from across the room. A 6 inch hoop holds one large initial with room for a small stem of leaves at the base. Use 3 strands for the outline and 2 strands for the petals so the flowers sit lighter than the letter.
Try this: stitch the letter first, then add flowers one side at a time.
Cost: $ | Difficulty: Easy | Time: 2 hours
2. Wildflower meadow letter
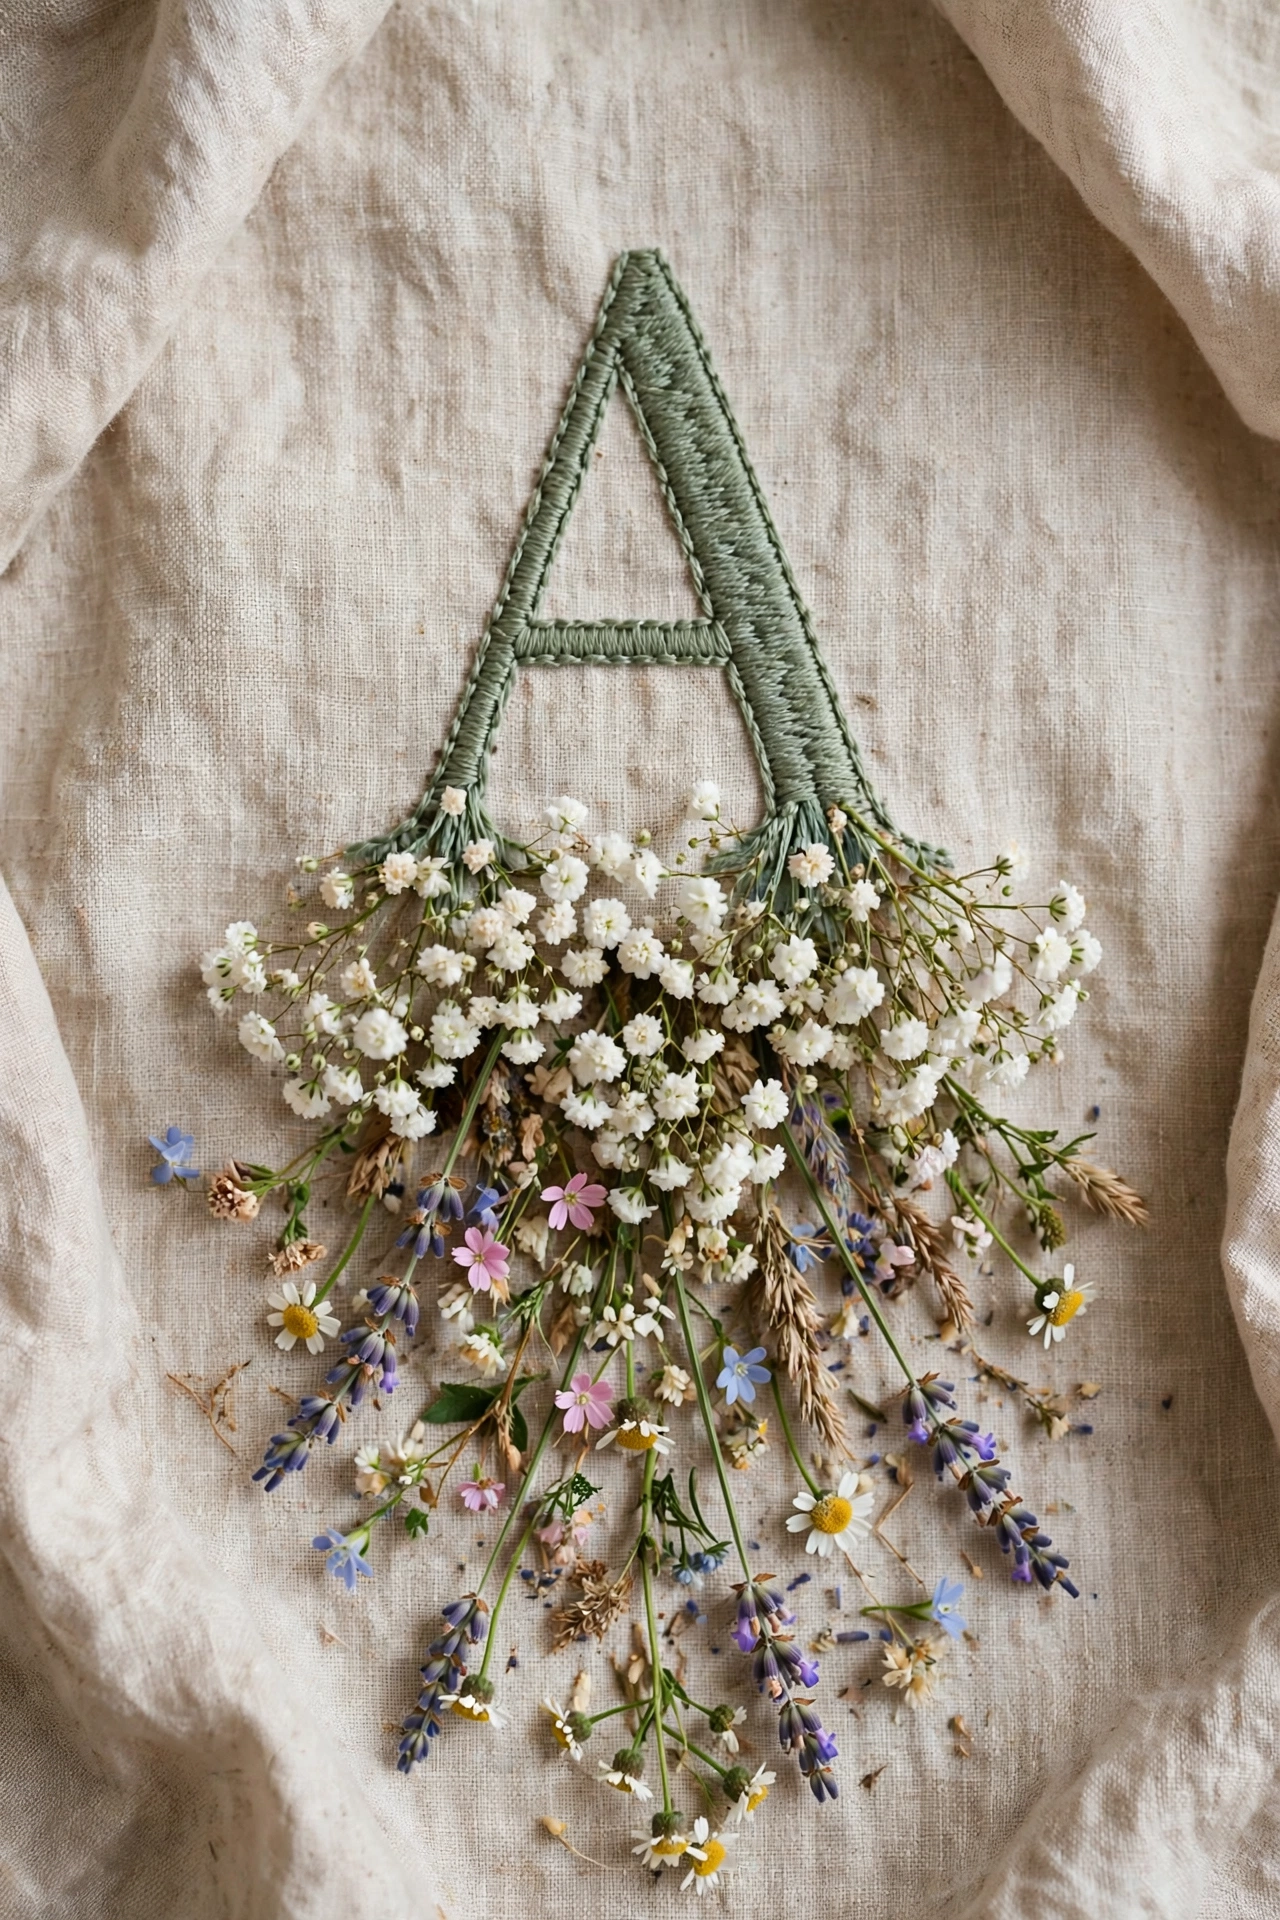
Let a mix of tiny wildflowers spill from the base of a tall serif letter like grass at the foot of a fence post. Stitch lavender sprigs in purple stem stitch, small daisies in lazy daisy, and baby’s breath as clusters of white French knots. Keep the top half of the letter bare so the shape reads at a glance. This design forgives uneven stitches because meadow flowers are not meant to match.
Try this: lay out three flower types on paper before you stitch, and repeat that trio across the base.
Cost: $ | Difficulty: Easy | Time: 2.5 hours
3. Rose vine script letter
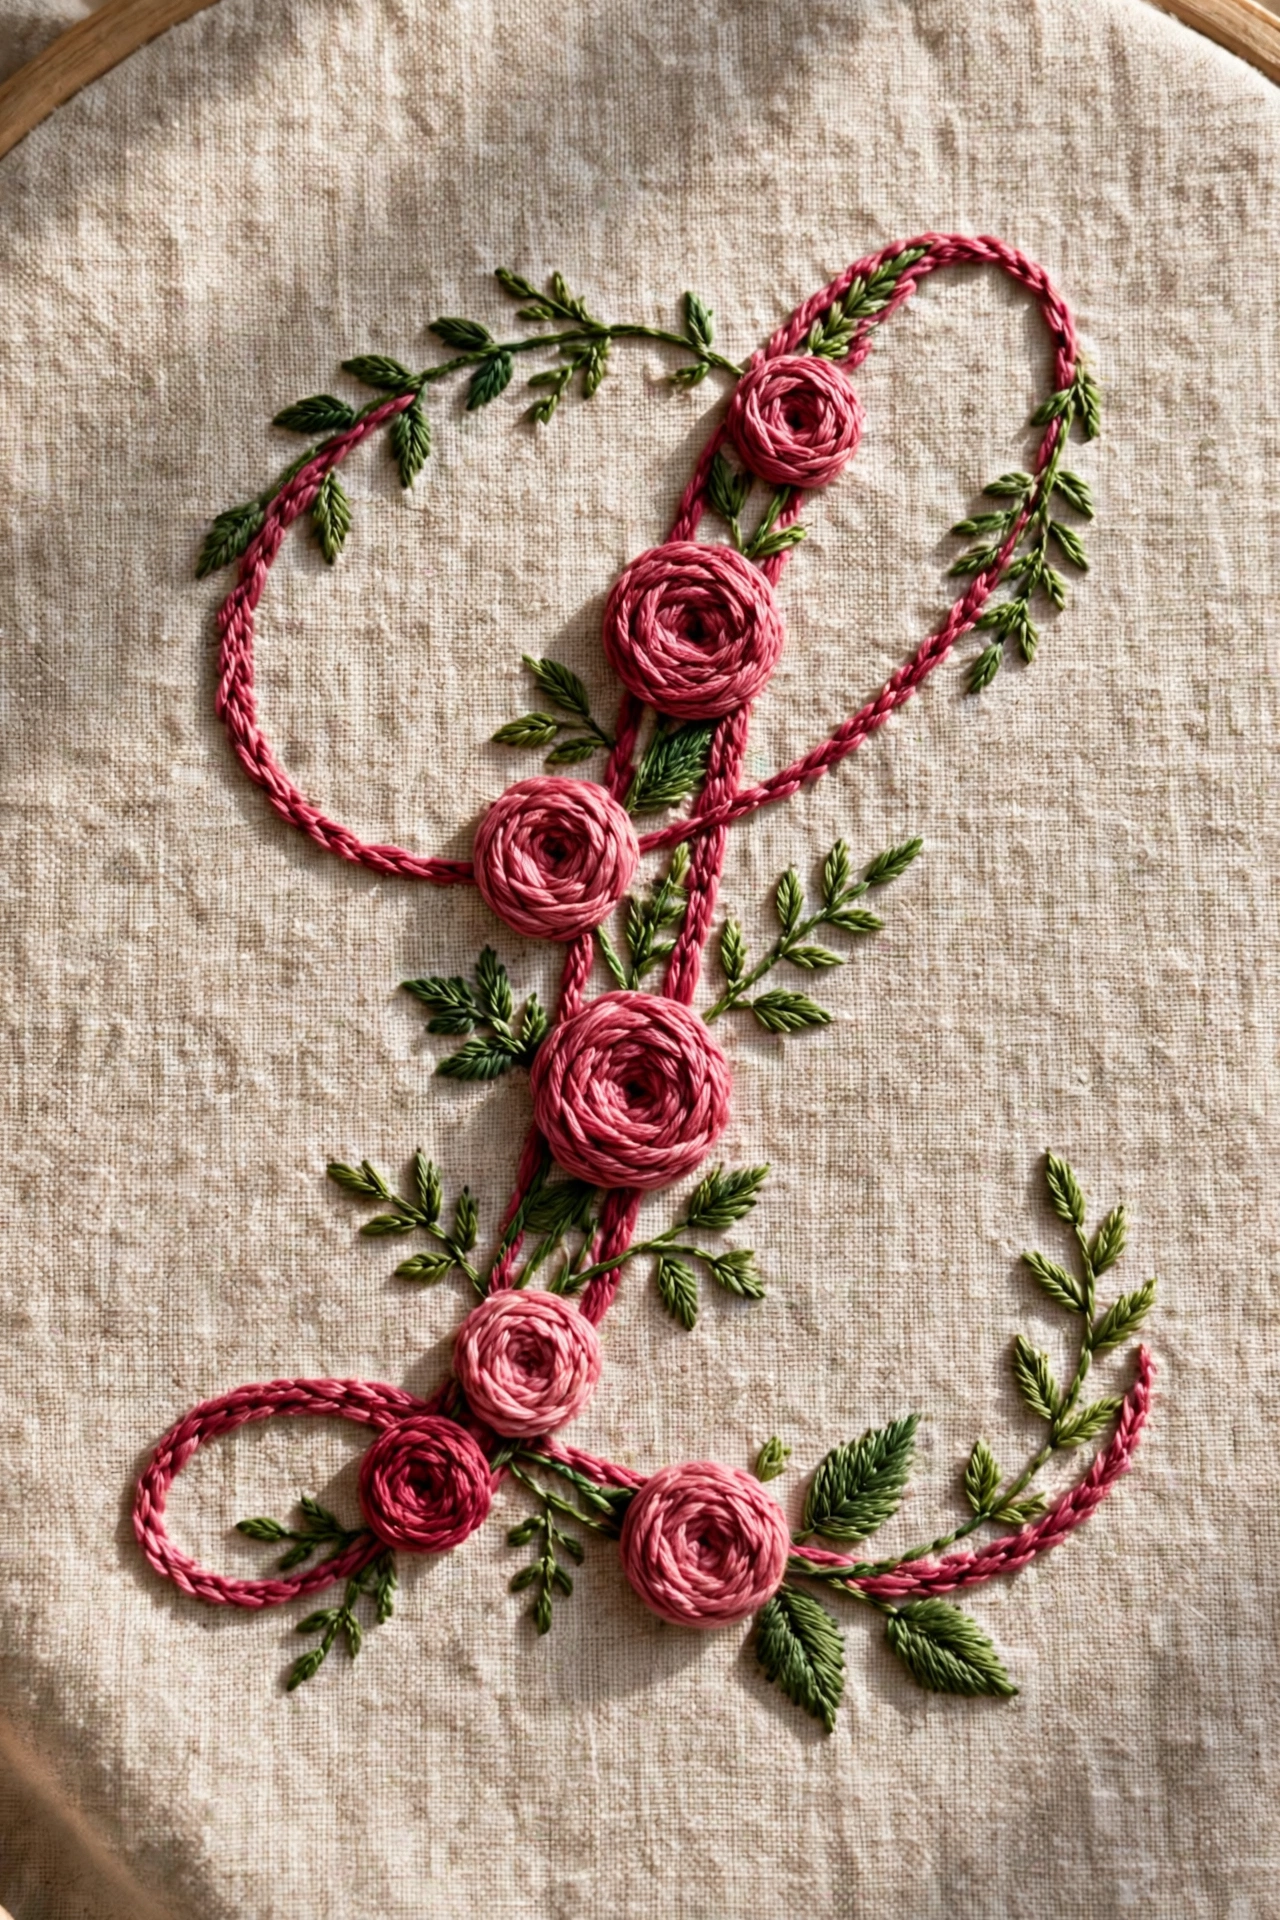
Wind a vine of woven wheel roses up the curves of a cursive letter, with small leaves tucked between the blooms. Make each rose by stitching a five point star base, then weaving floss over and under until the petals puff up. Use deep pink for the roses and two greens for the leaves so the vine reads clearly against cream linen. Script letters suit this design because their loops give the vine natural places to climb.
Try this: stitch one rose at each curve of the letter, then connect them with stem stitch vines.
Cost: $ | Difficulty: Moderate | Time: 4 hours
4. Lavender sprig monogram
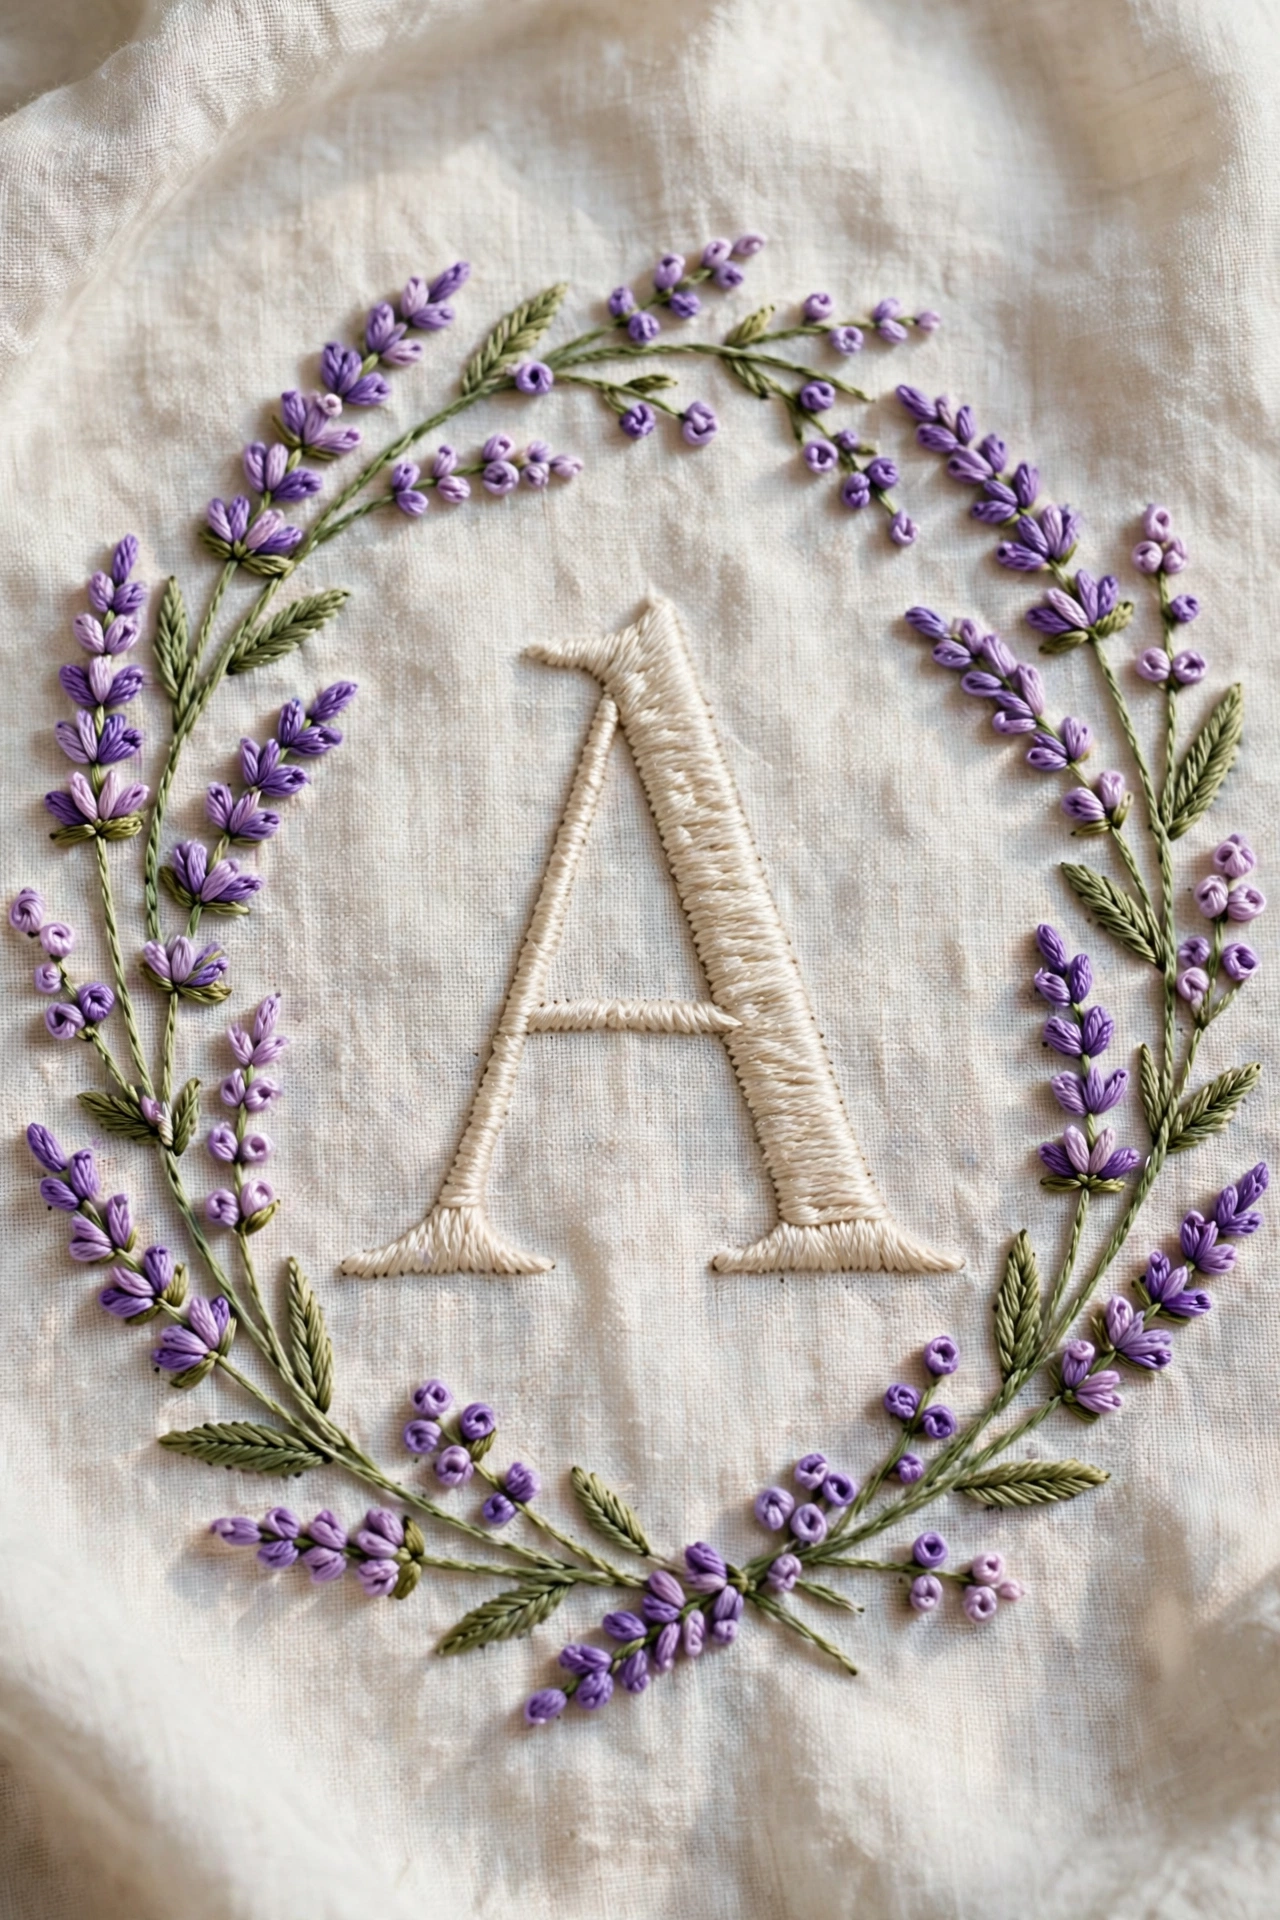
Frame a serif letter with upright lavender stems, each one a straight stem stitch stalk topped with purple French knot buds. Place three stems on the left and two on the right so the frame feels full without crowding the letter. Lavender works well for gifts because the color reads as calm and the stitching stays simple. Use two purples, one light and one dark, to give the buds depth.
Try this: knot the buds in clusters of three along each stalk rather than spacing them evenly.
Cost: $ | Difficulty: Easy | Time: 2 hours
5. Fern and eucalyptus letter
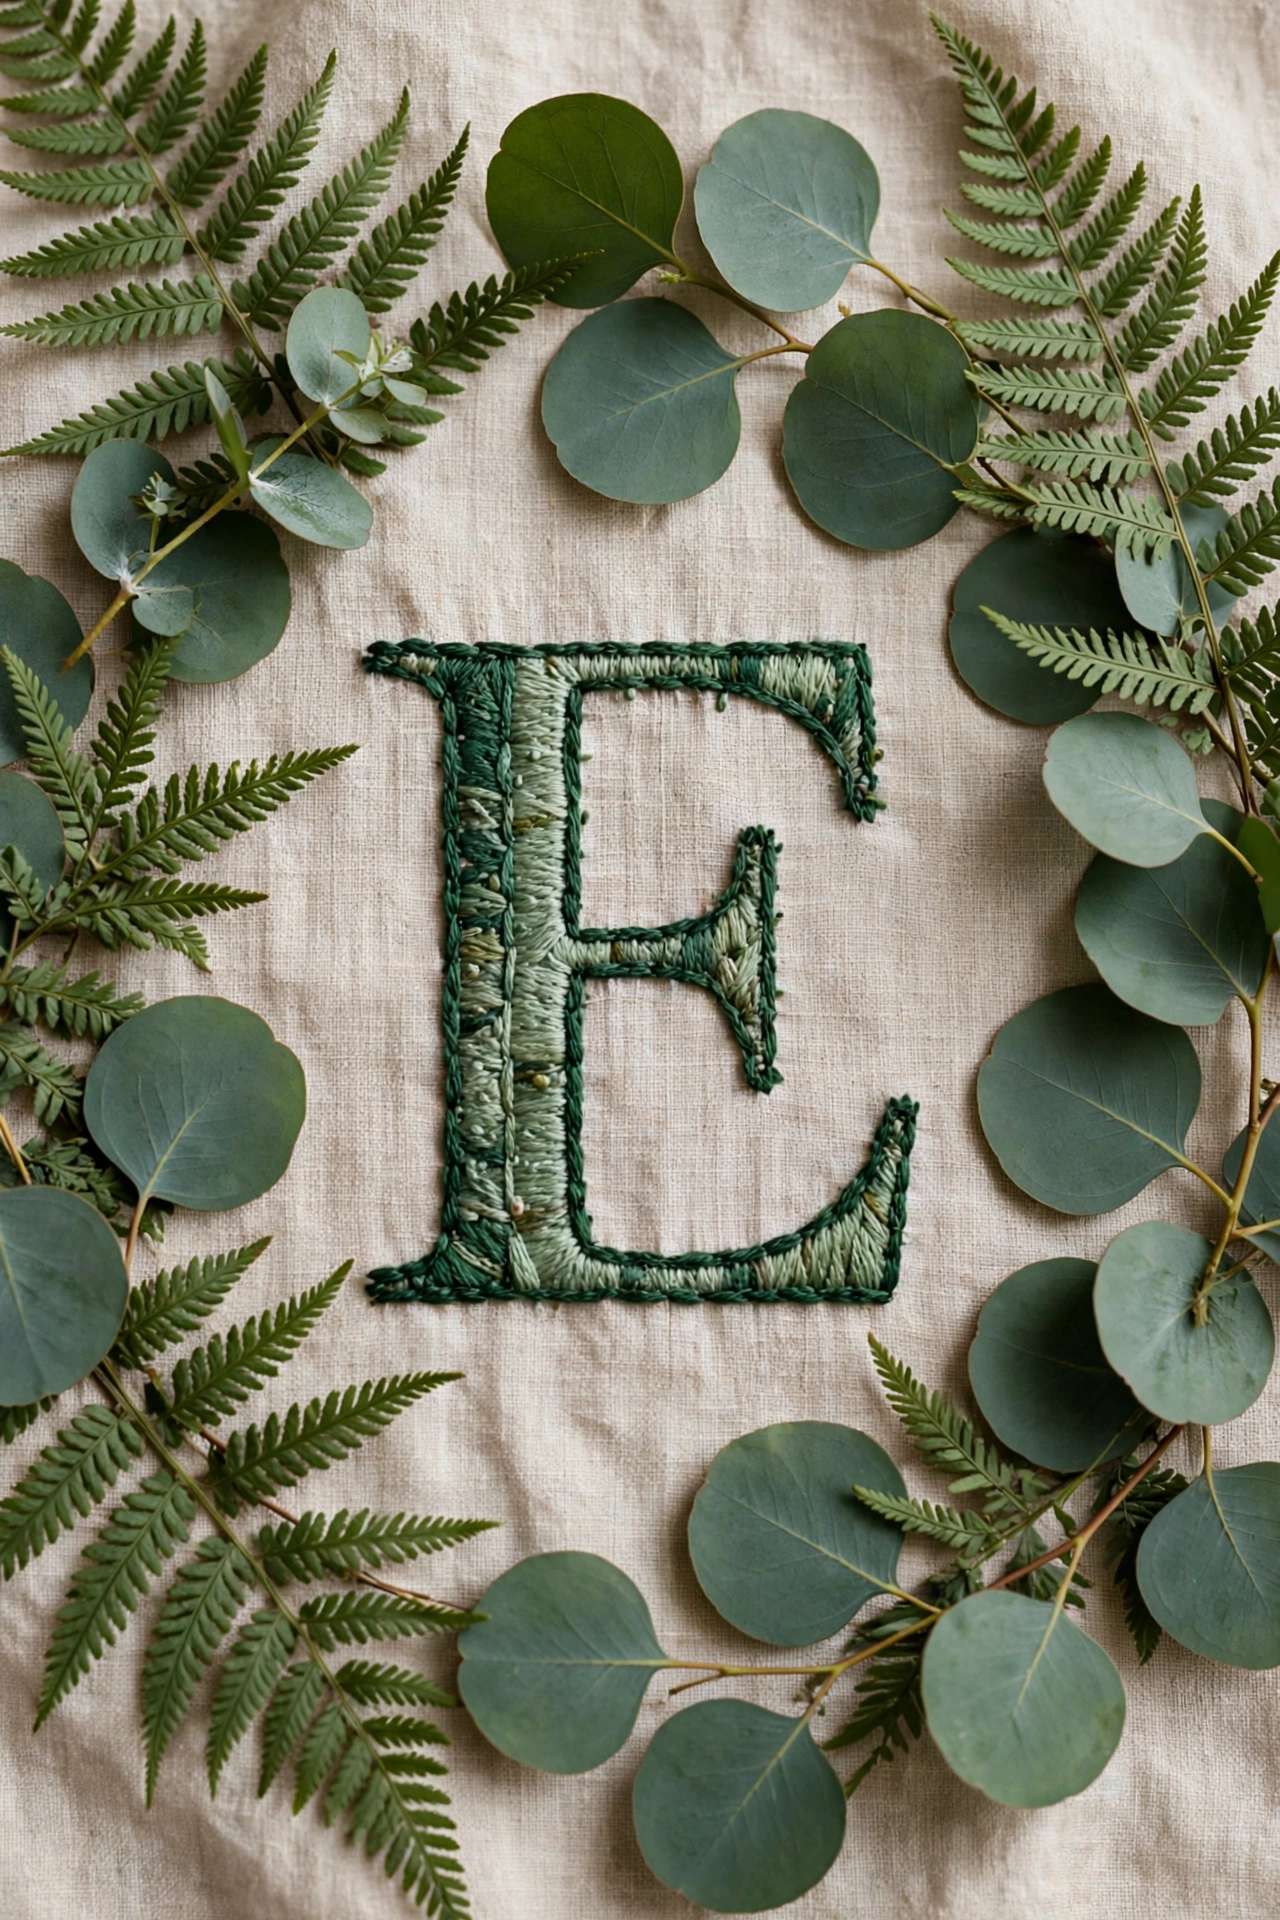
Skip flowers entirely and surround a block letter with fern fronds and round eucalyptus leaves in sage and deep green. Fishbone stitch makes a fern frond in one pass: short diagonal stitches that grow longer toward the middle, then shorter again at the tip. Eucalyptus rounds are simple satin stitch circles on a thin stem stitch stalk. This foliage only design suits a calm bedroom wall and uses just three skeins.
Try this: mix one light green and one dark green in each frond for shadow.
Cost: $ | Difficulty: Easy | Time: 2 hours
6. Sunflower corner letter
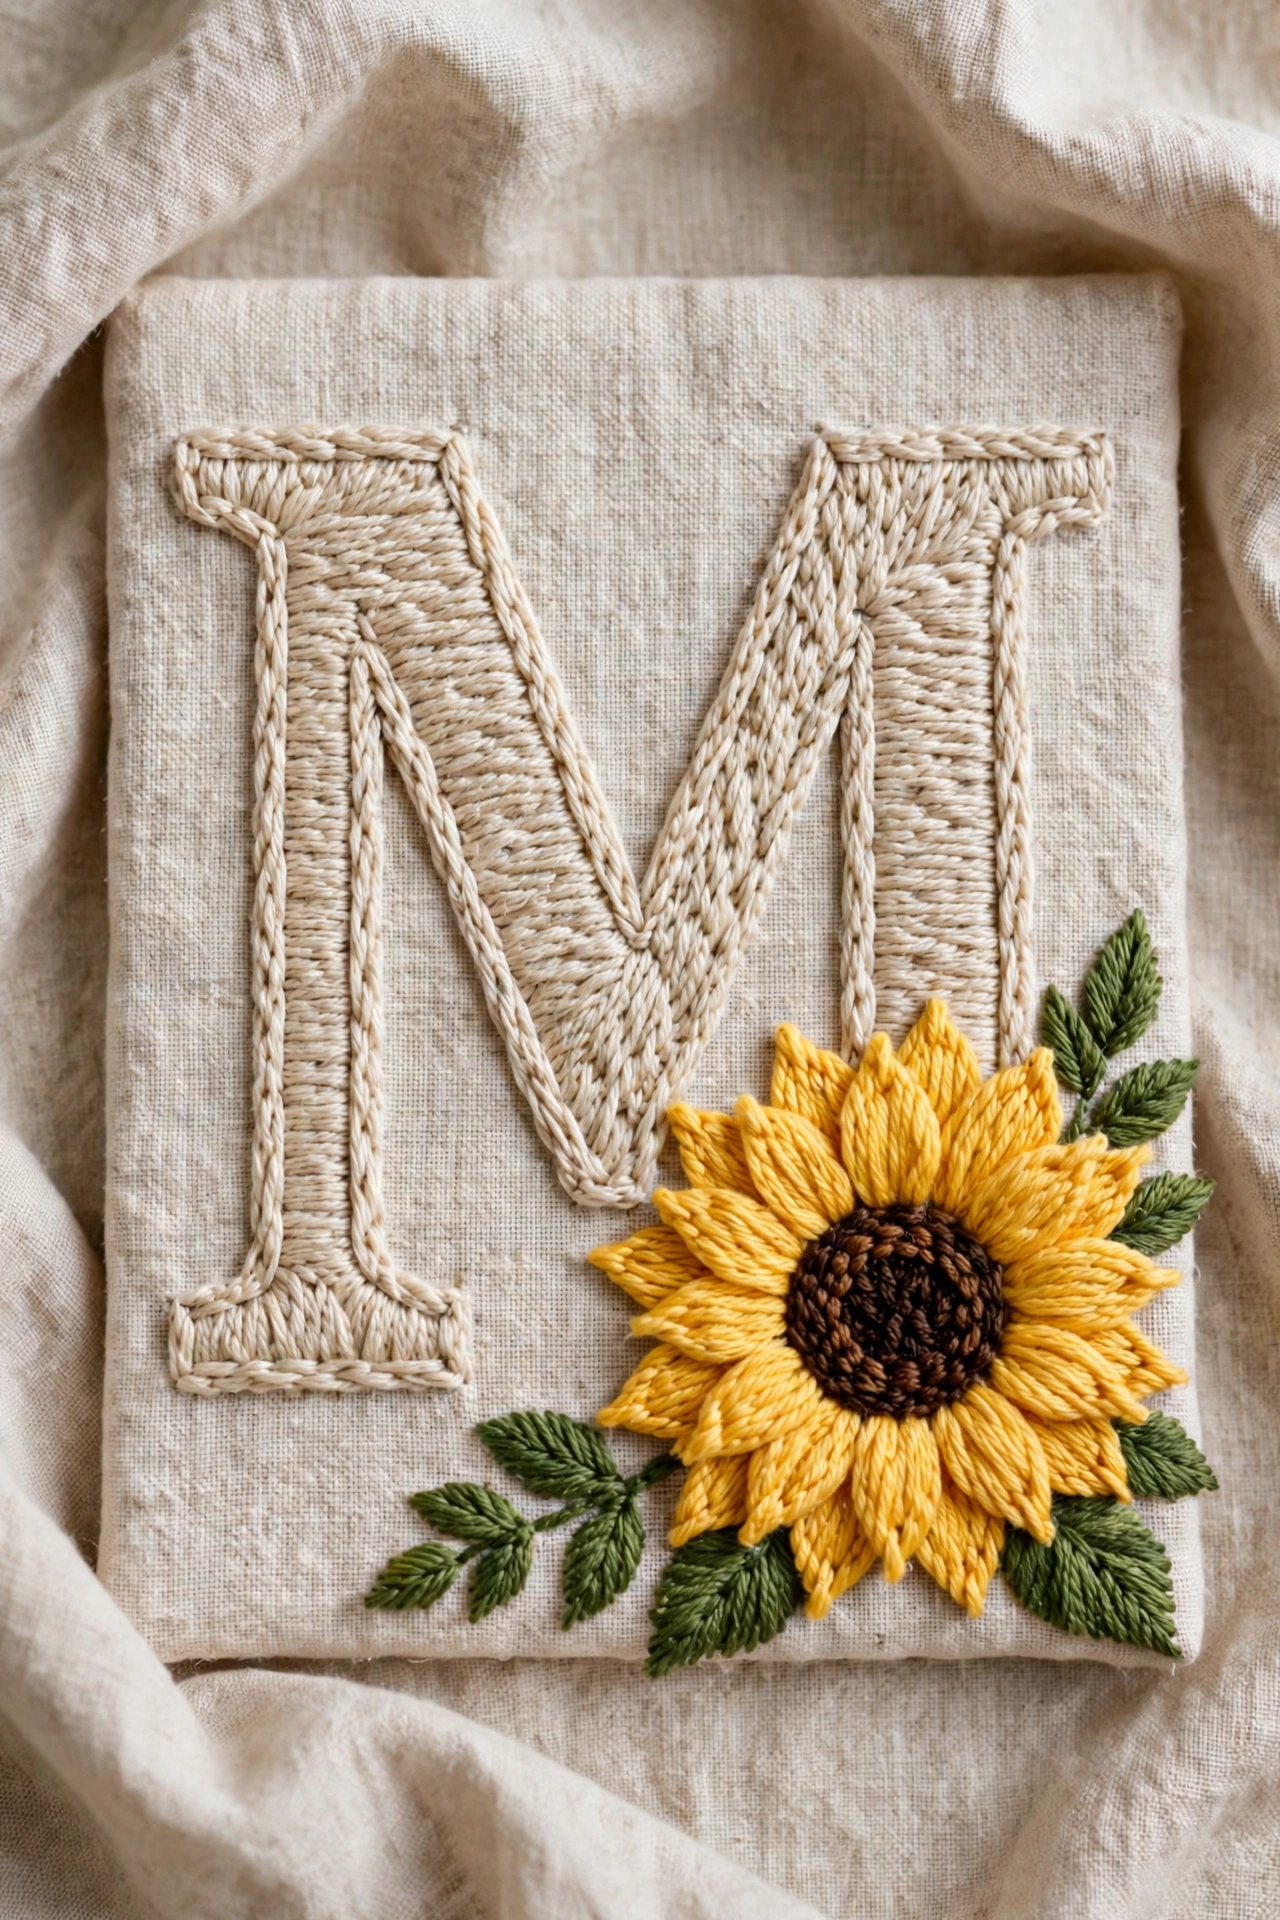
Put one large sunflower at the lower corner of a block letter and leave the rest of the design bare. Build the sunflower as a woven wheel in golden yellow with a brown French knot center, then add two fishbone leaves on a green stem. A single bold flower keeps the letter dominant, which matters for initials hung where guests see them first. Outline the letter in stem stitch with 3 strands so it holds its own next to the flower.
Try this: make the sunflower about one third the height of the letter.
Cost: $ | Difficulty: Easy | Time: 2.5 hours
7. Birth flower initial
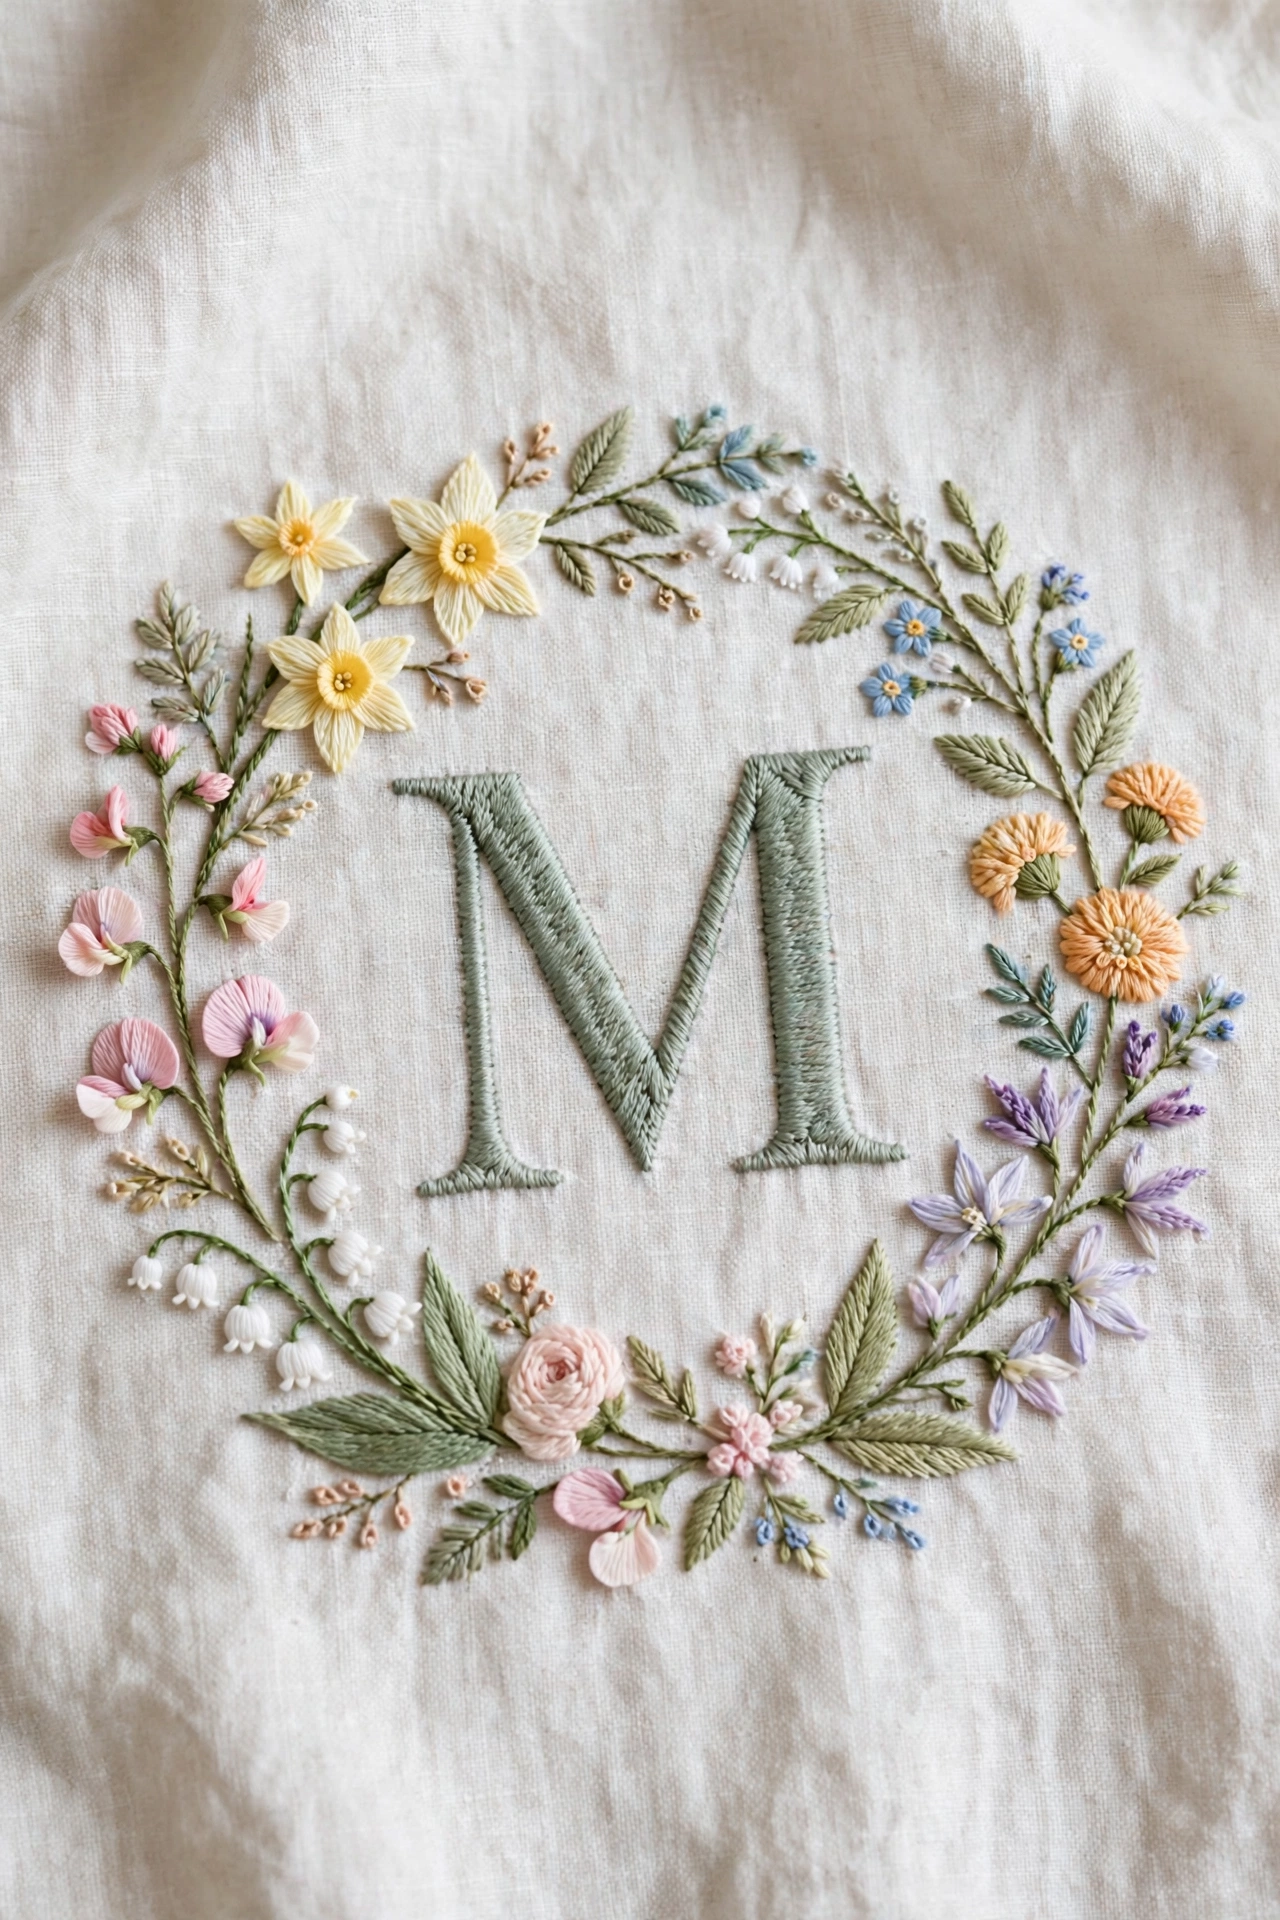
Match the flowers to the recipient’s birth month, then frame a simple letter with that one bloom repeated in three sizes. Carnation suits January, violet suits February, daffodil suits March, daisy suits April, lily of the valley suits May, and rose suits June, while later months follow the same one flower rule. Repeating one flower type keeps the shopping list short: two floss colors for the bloom and one green for leaves.
Try this: stitch the largest bloom at the base and two smaller ones rising up one side.
Cost: $ | Difficulty: Easy | Time: 2.5 hours
8. Tiny bouquet letter
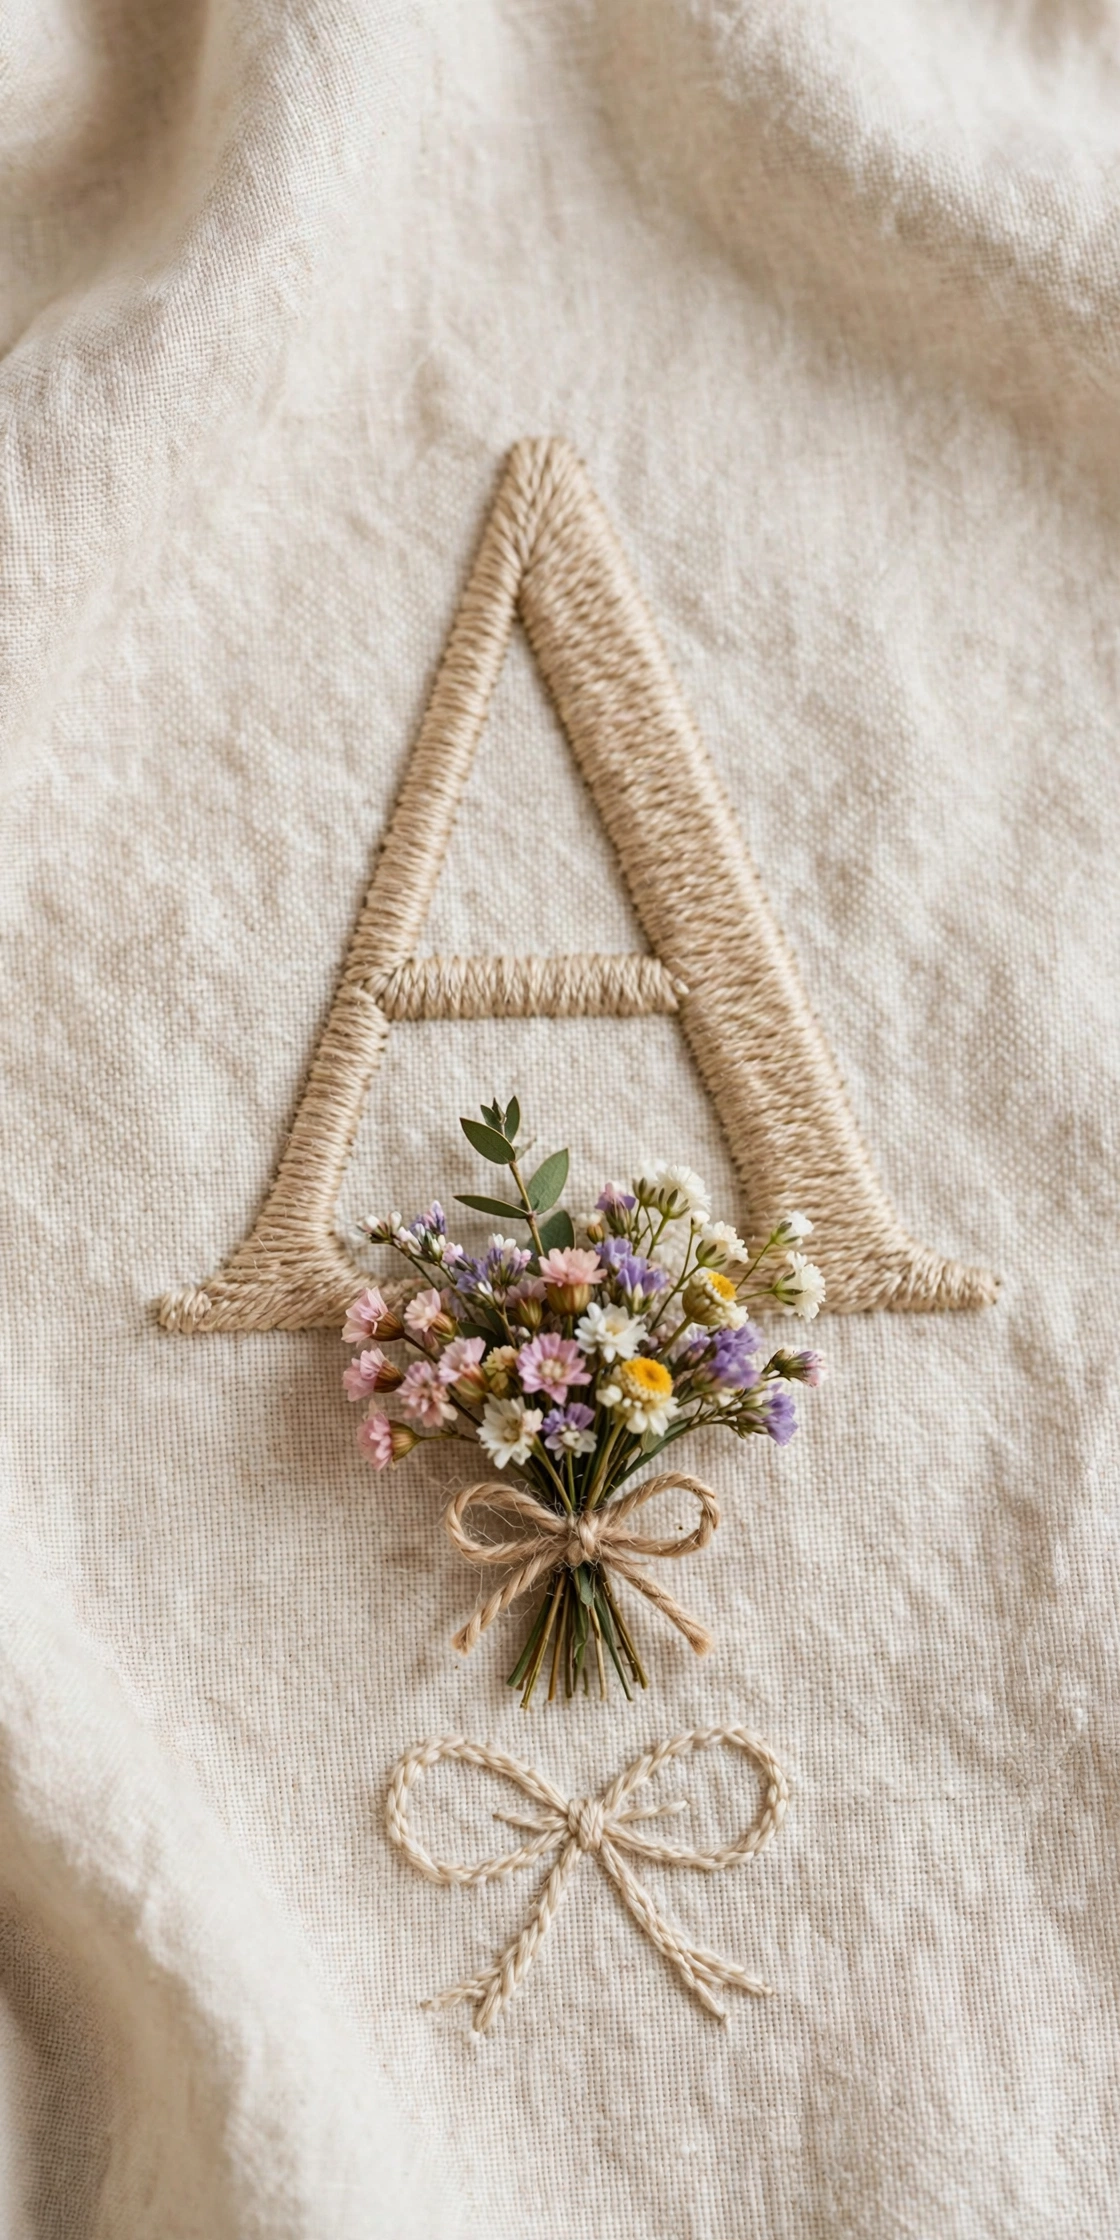
Gather a small posy at the foot of the letter and tie it with a stitched bow in a contrast color. The bouquet holds five or six mini blooms: two lazy daisy flowers, two French knot clusters, and one tiny woven wheel rose, all on short green stems. A bow in satin stitch ribbon shape finishes the bunch and hides where the stems meet. This design makes a sweet gift topper when stitched on a small square of linen and framed in a 4 inch hoop.
Try this: stitch the bow last so it covers any messy stem ends.
Cost: $ | Difficulty: Easy | Time: 2 hours
9. Wreath ring letter
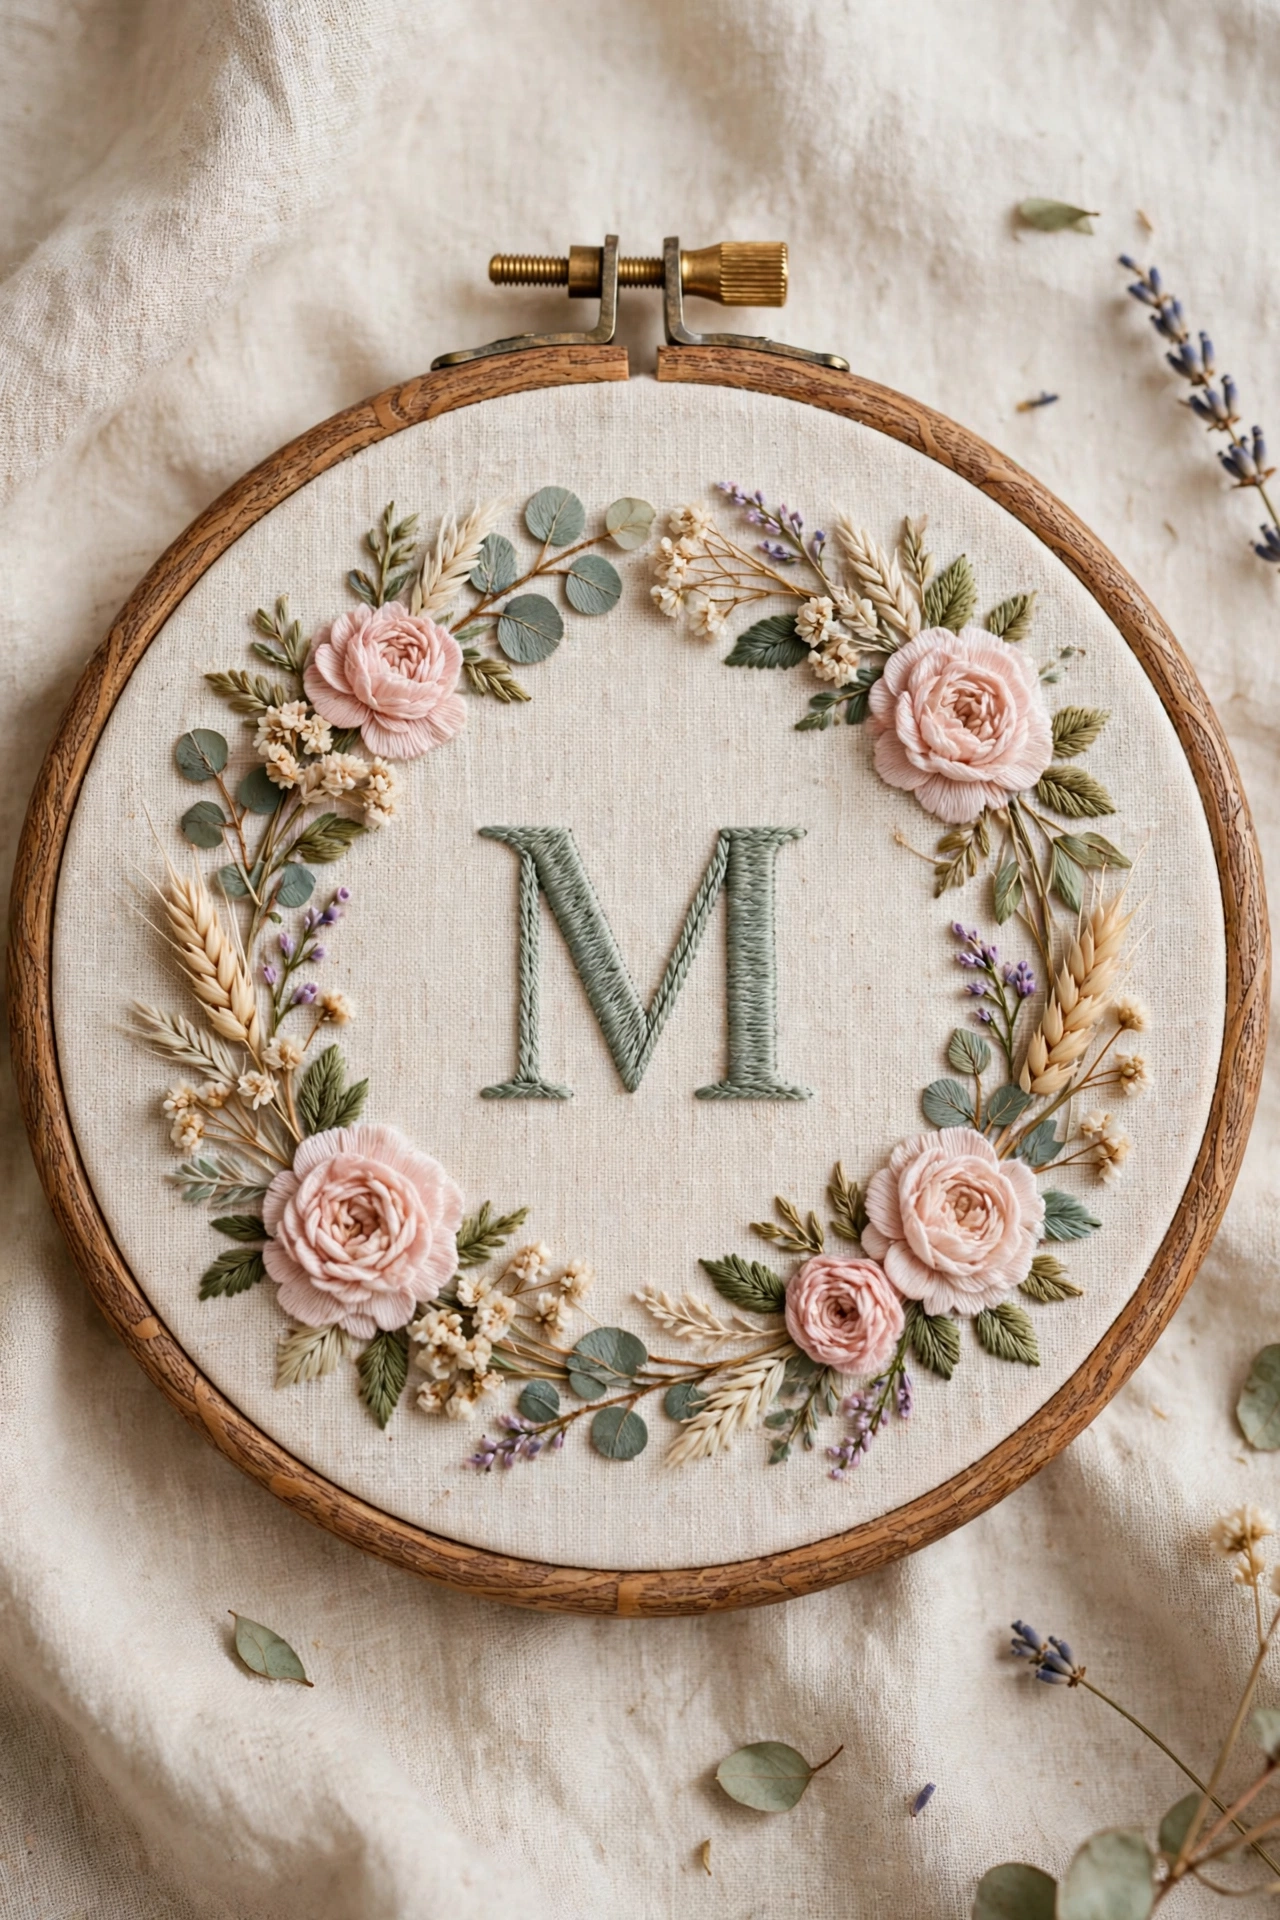
Stitch a full floral wreath ring first, then place a plain block letter in the center with no flowers touching it. The ring mixes small roses, daisies, and leaves around a stem stitch circle, spaced evenly so the wreath looks balanced from every angle. Centering a bare letter inside a busy ring gives the eye a rest point and keeps the initial readable. A 7 inch hoop fits the ring with room to spare.
Try this: mark the circle with a plate or jar lid before stitching so the ring stays round.
Cost: $$ | Difficulty: Moderate | Time: 4 hours
10. Trailing ivy letter
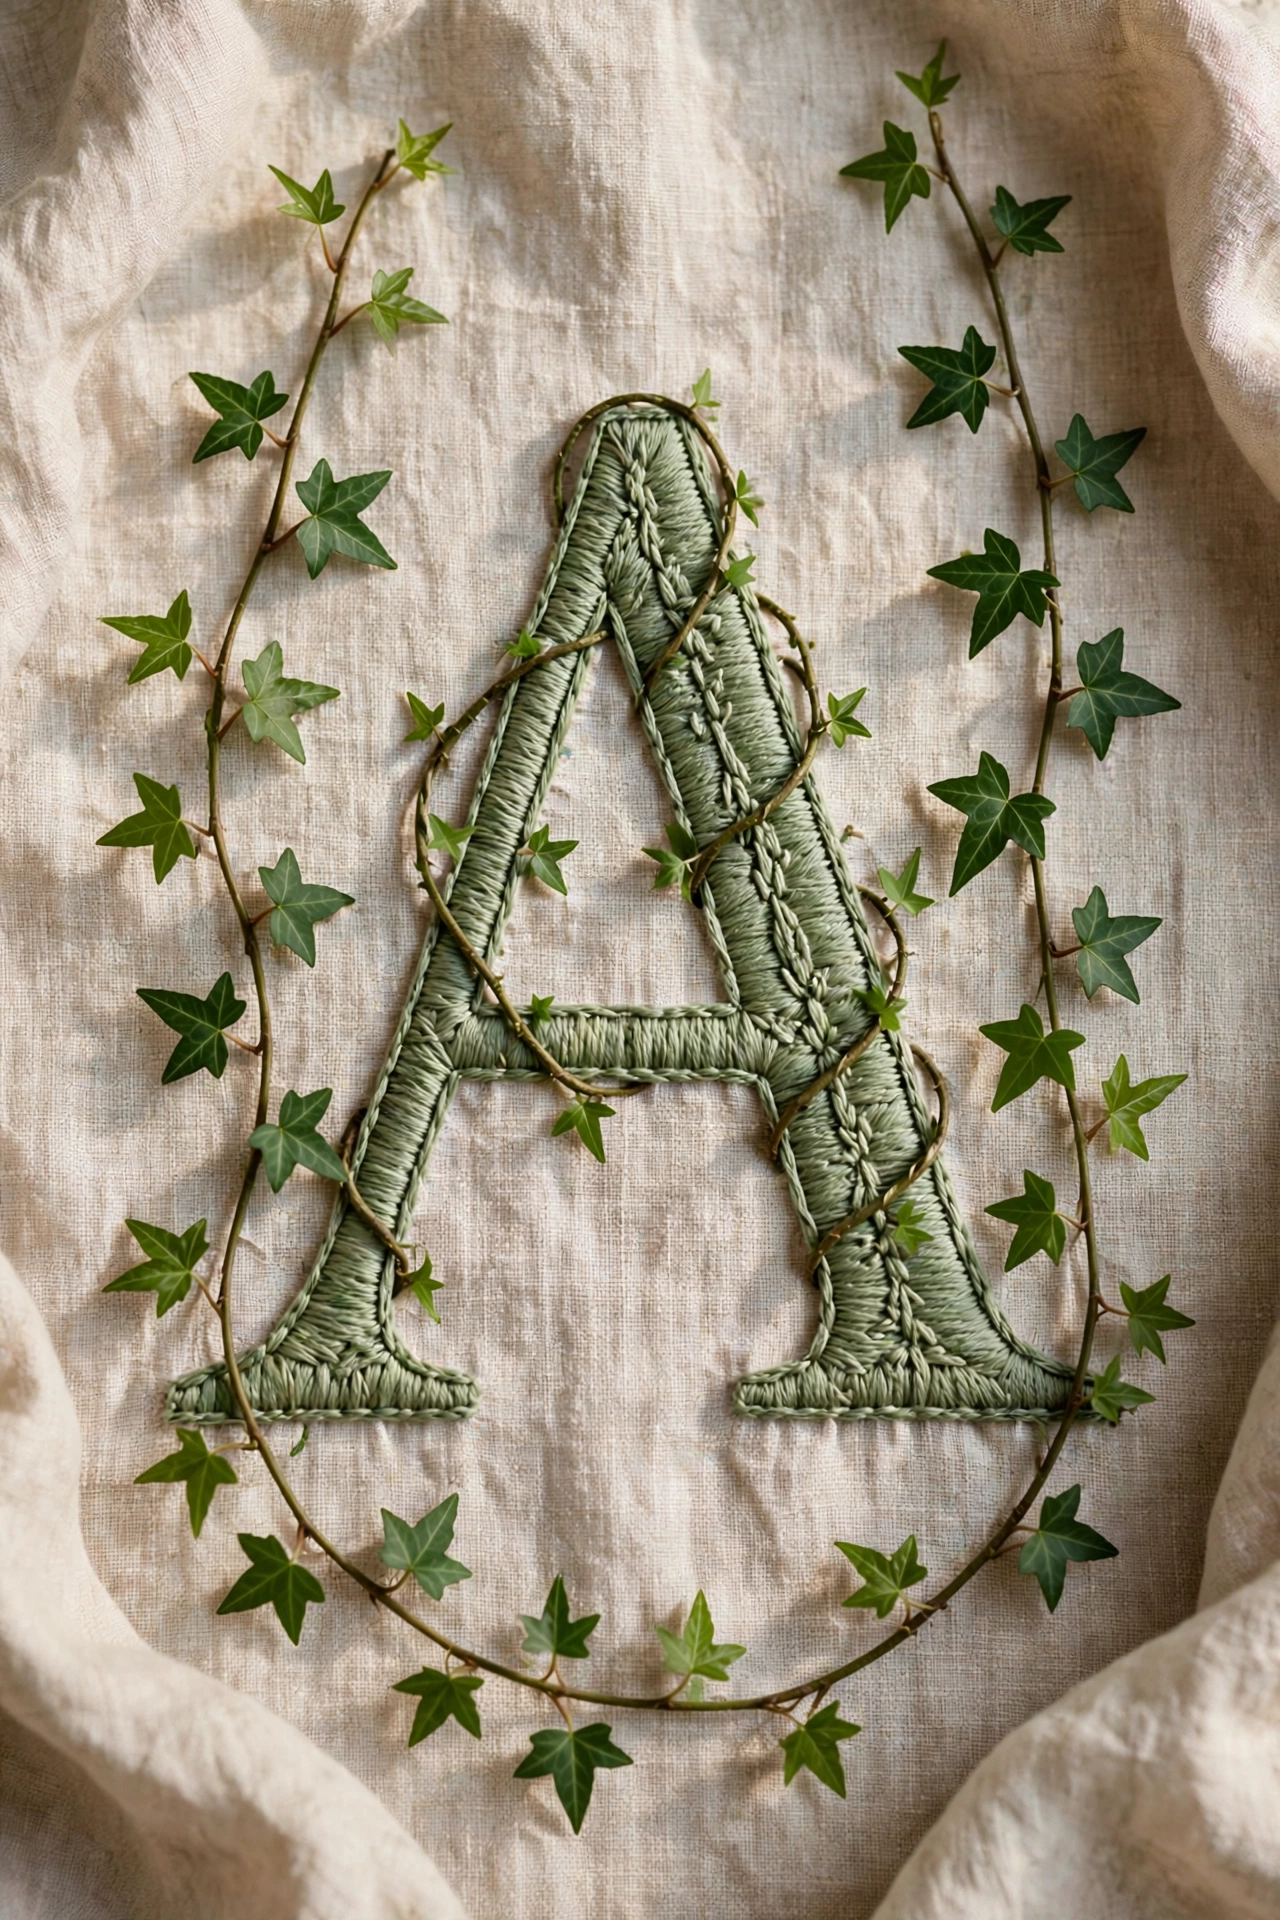
Wrap a single ivy vine around a tall letter so leaves trail off both sides like a plant growing up a trellis. Stitch the vine in stem stitch, then add pointed leaves in satin stitch, alternating sides as the vine climbs. Keep the leaves small, about the width of a pencil eraser, so they decorate the letter instead of hiding it. One green skein covers the whole vine, which keeps this project cheap and quick.
Try this: start the vine at the bottom and work upward so your hand does not drag over finished leaves.
Cost: $ | Difficulty: Easy | Time: 2 hours
11. Pastel spring letter
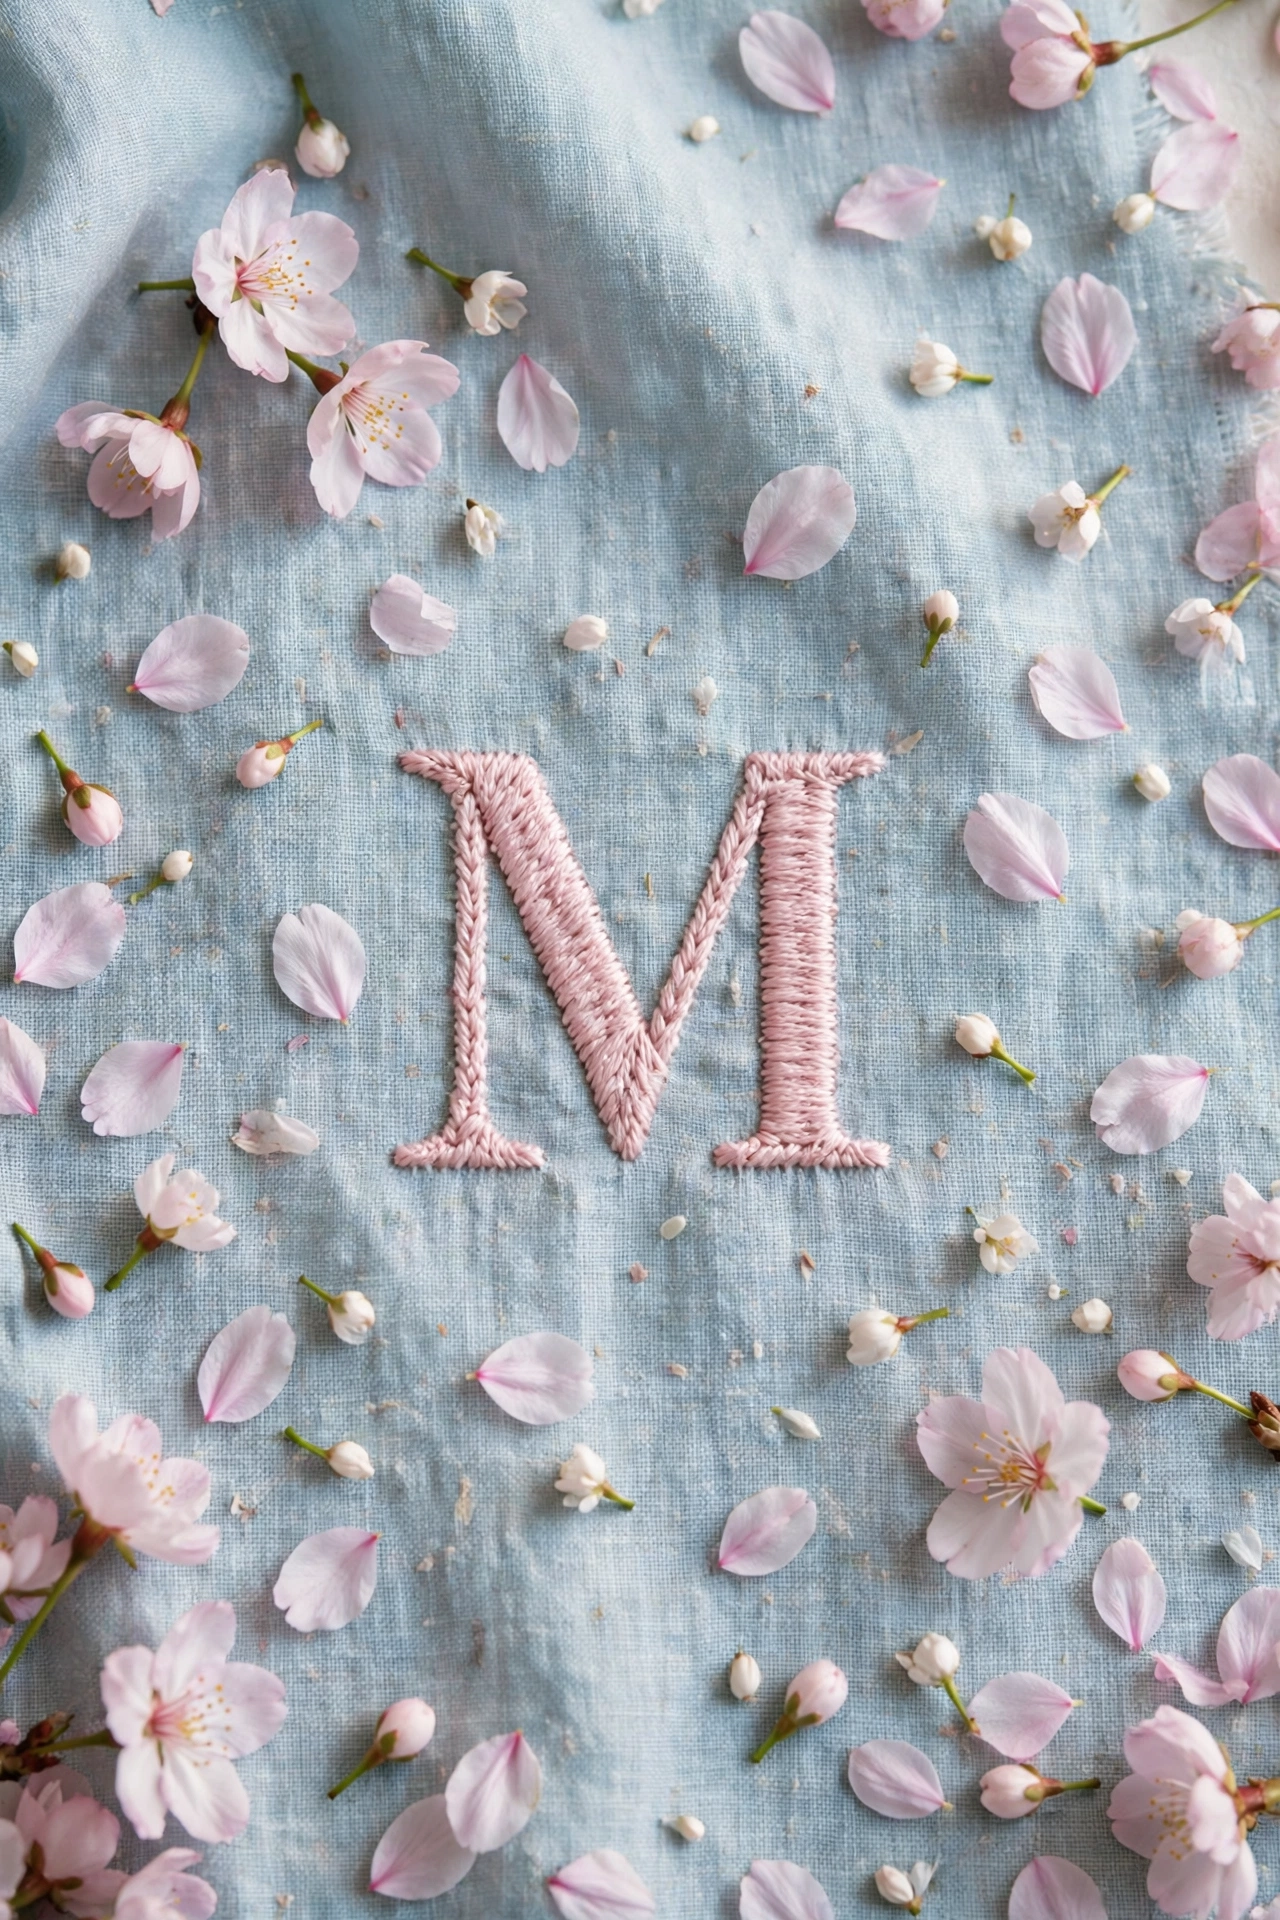
Use soft pink, peach, and white for a spring letter that feels light on pale blue or cream fabric. Cherry blossom petals in lazy daisy stitch cluster along the top curve of the letter, with tiny white French knot buds scattered below. Pastel floss needs a light fabric behind it, since dark cloth dulls pale colors. Limit the palette to three pastels plus one green so the design stays calm.
Try this: stitch the darkest pink first, then layer lighter petals over it for depth.
Cost: $ | Difficulty: Easy | Time: 2.5 hours
12. Autumn leaf letter
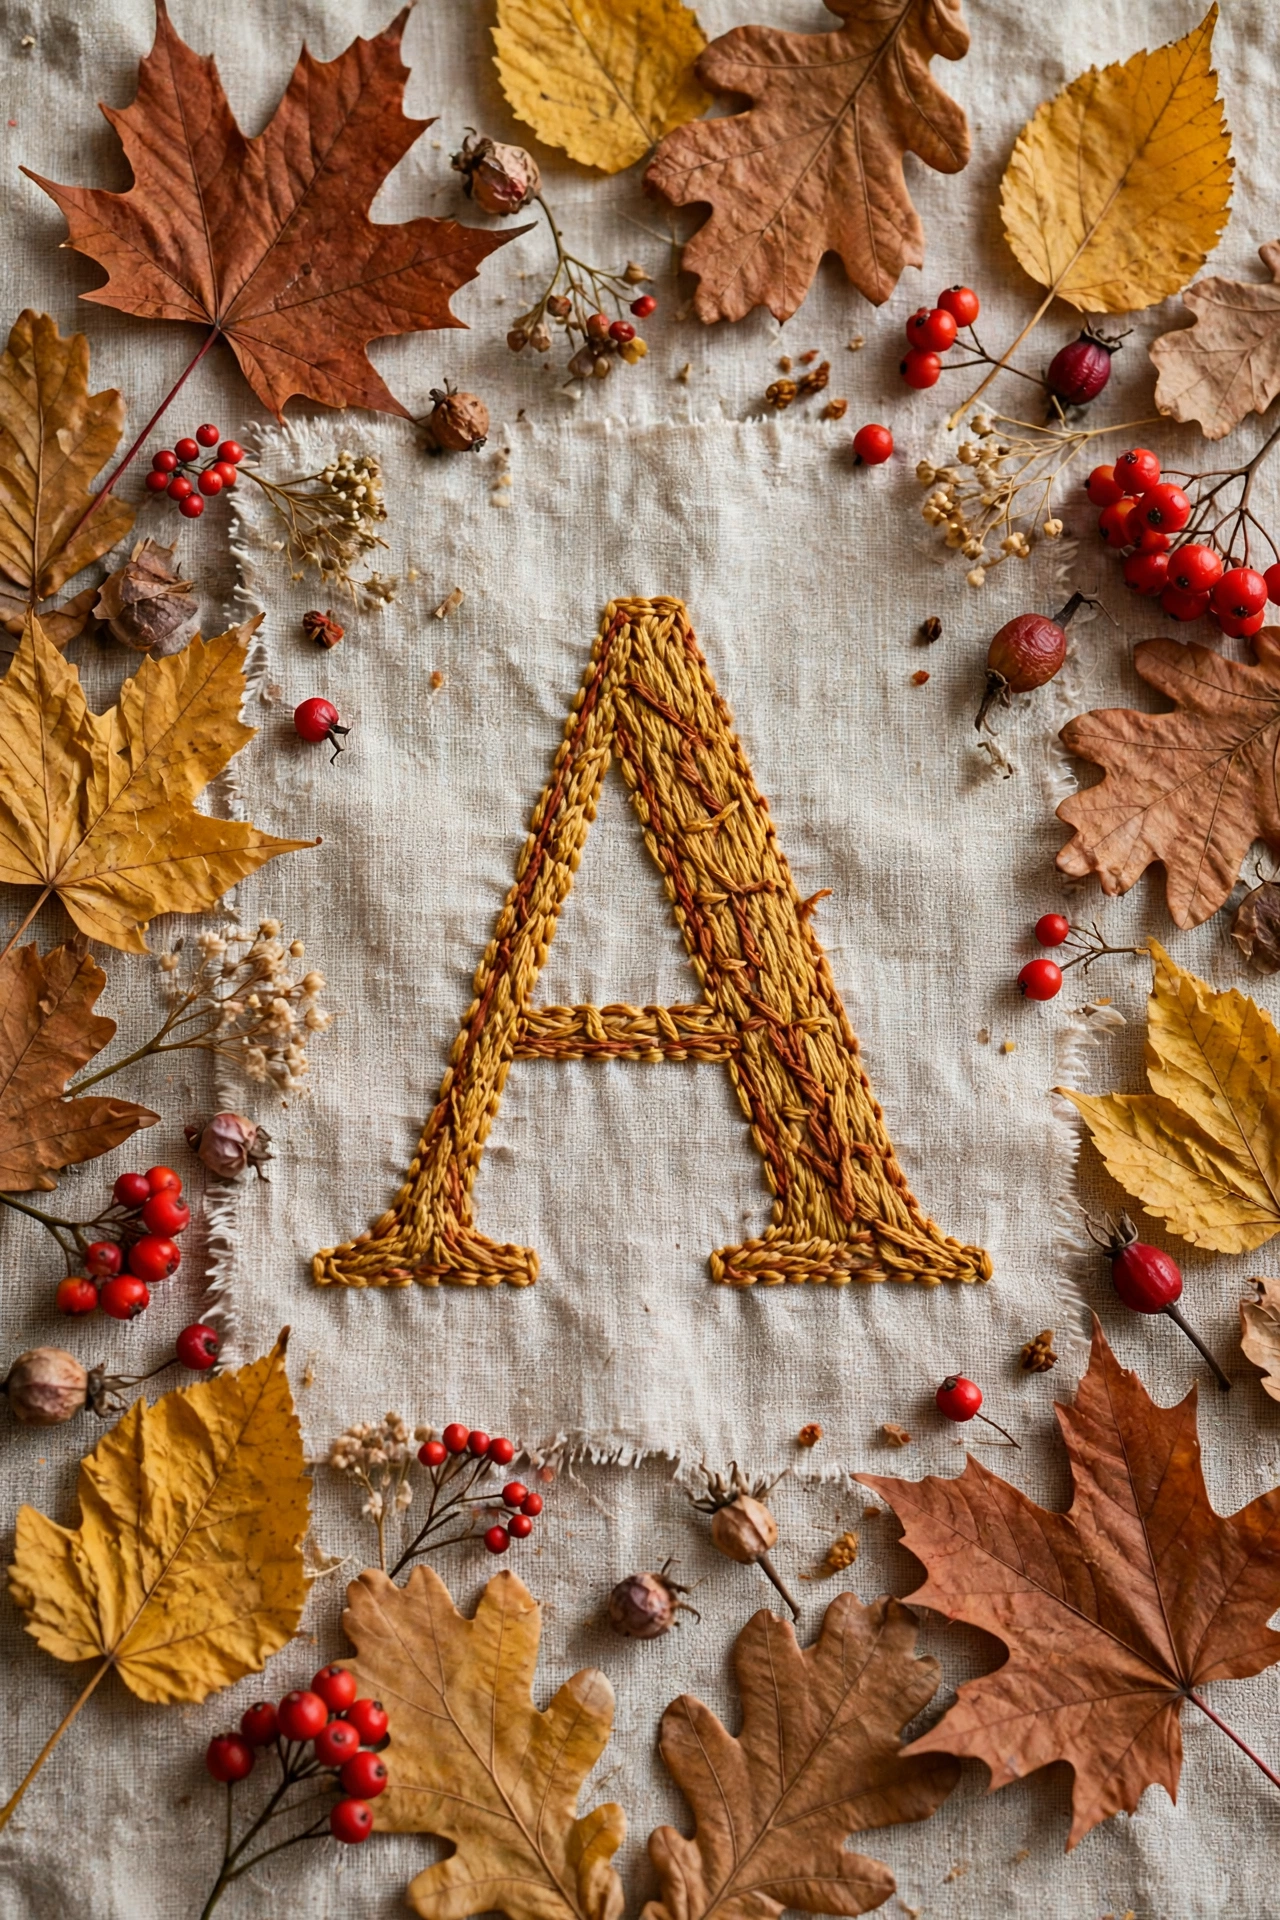
Trade flowers for fall leaves in rust, gold, and mustard, with a few tiny red French knot berries for contrast. Fishbone stitch leaves in three sizes gather at the base and one upper corner, leaving the middle of the letter clear. Autumn colors pop best on natural or oatmeal linen rather than bright white. This design suits a seasonal wall display and pairs well with a wooden hoop.
Try this: stitch the largest leaf first to set the scale, then fill around it with smaller ones.
Cost: $ | Difficulty: Easy | Time: 2.5 hours
13. Daisy confetti filled letter
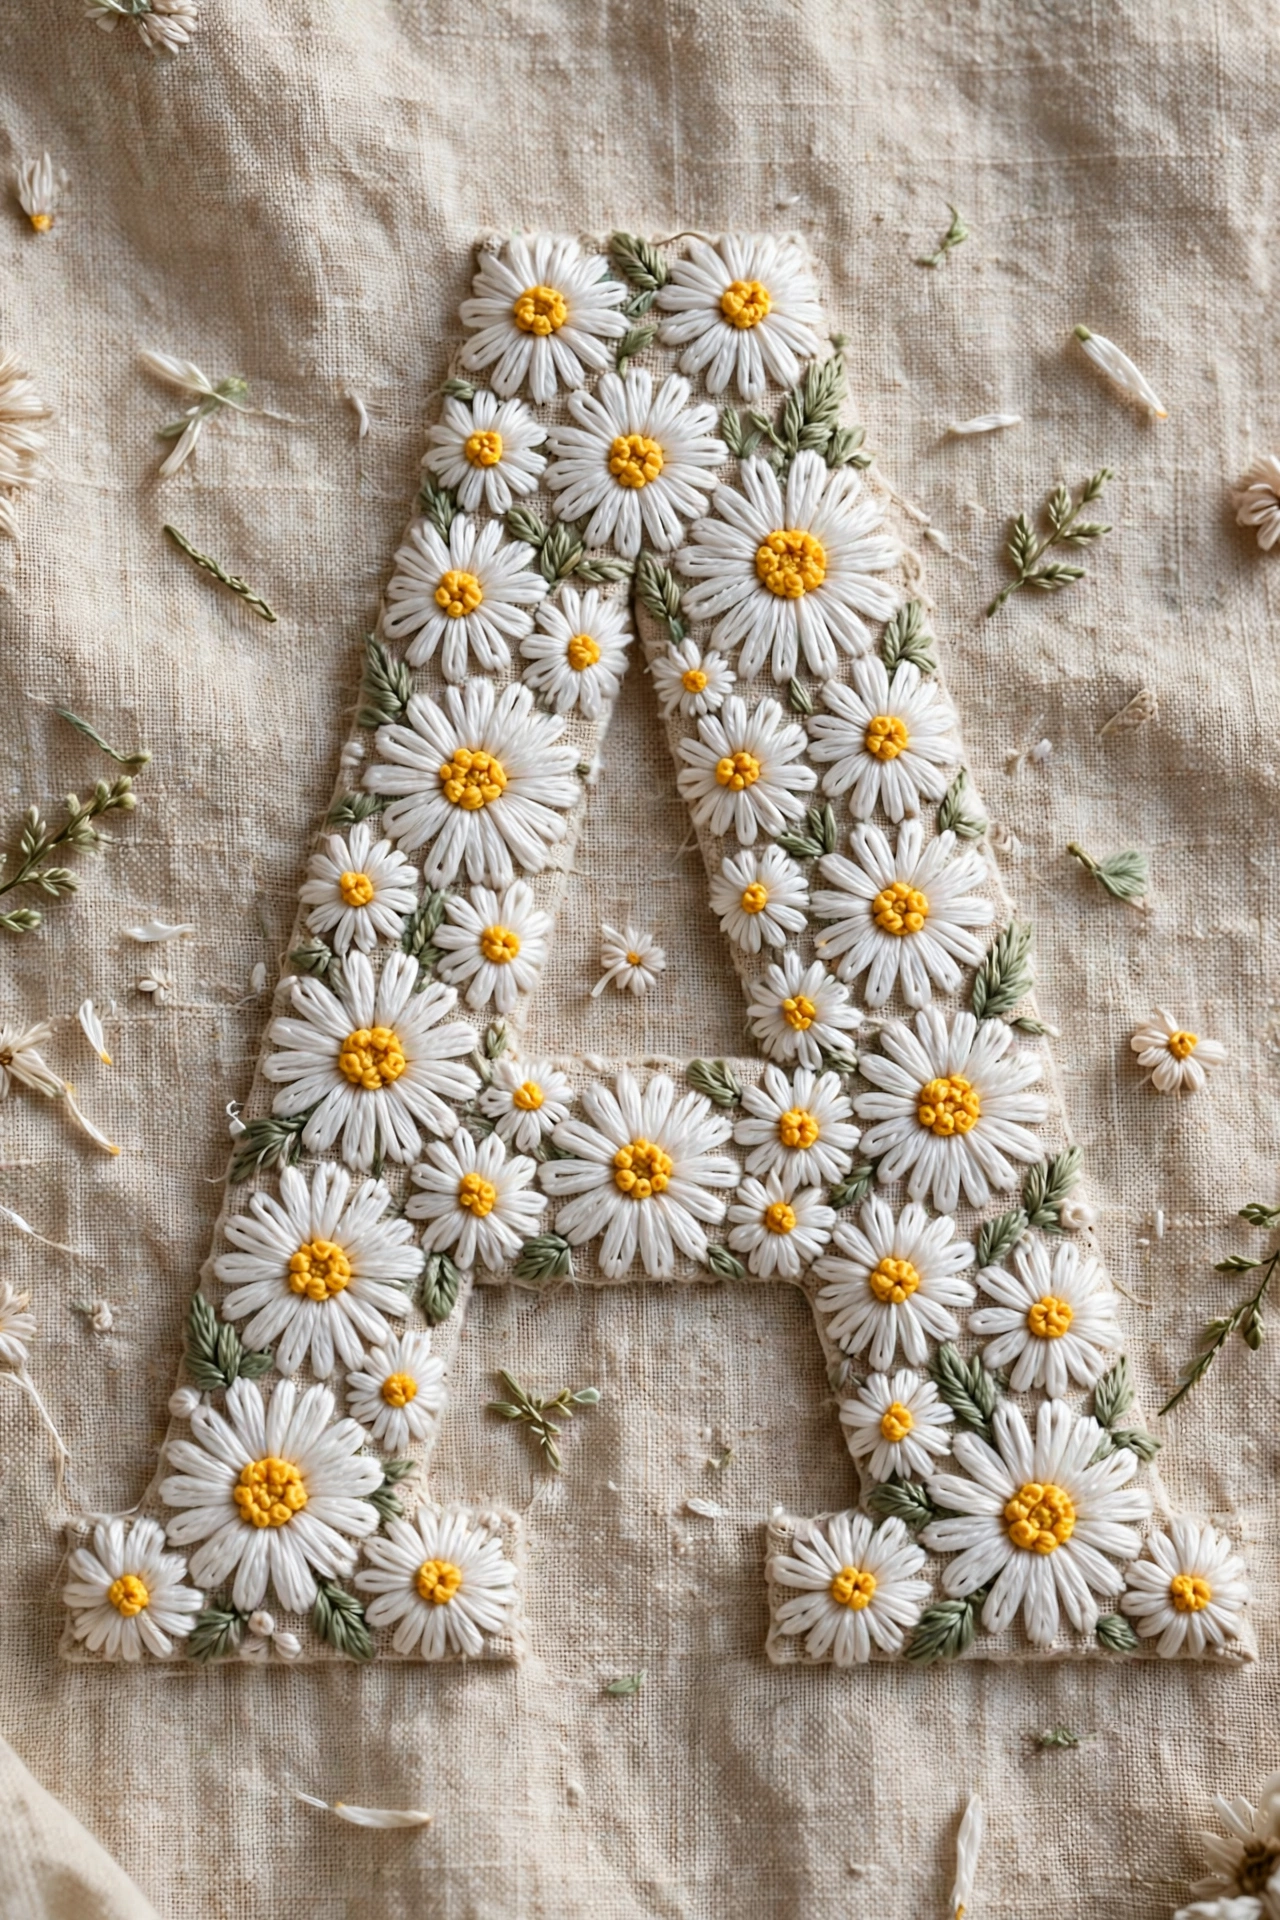
Fill the whole letter shape with scattered daisies and French knot centers instead of outlining it. Draw the letter, then pack the inside with small lazy daisy flowers in white and yellow, leaving only hairline gaps of fabric showing. A filled letter reads as one bold flower shape from a distance and rewards a closer look. Use 2 strands throughout so the fill stays flat and even.
Try this: start at the edges of the letter and work inward so no petal crosses the outline.
Cost: $ | Difficulty: Moderate | Time: 3.5 hours
14. Two-letter wedding monogram
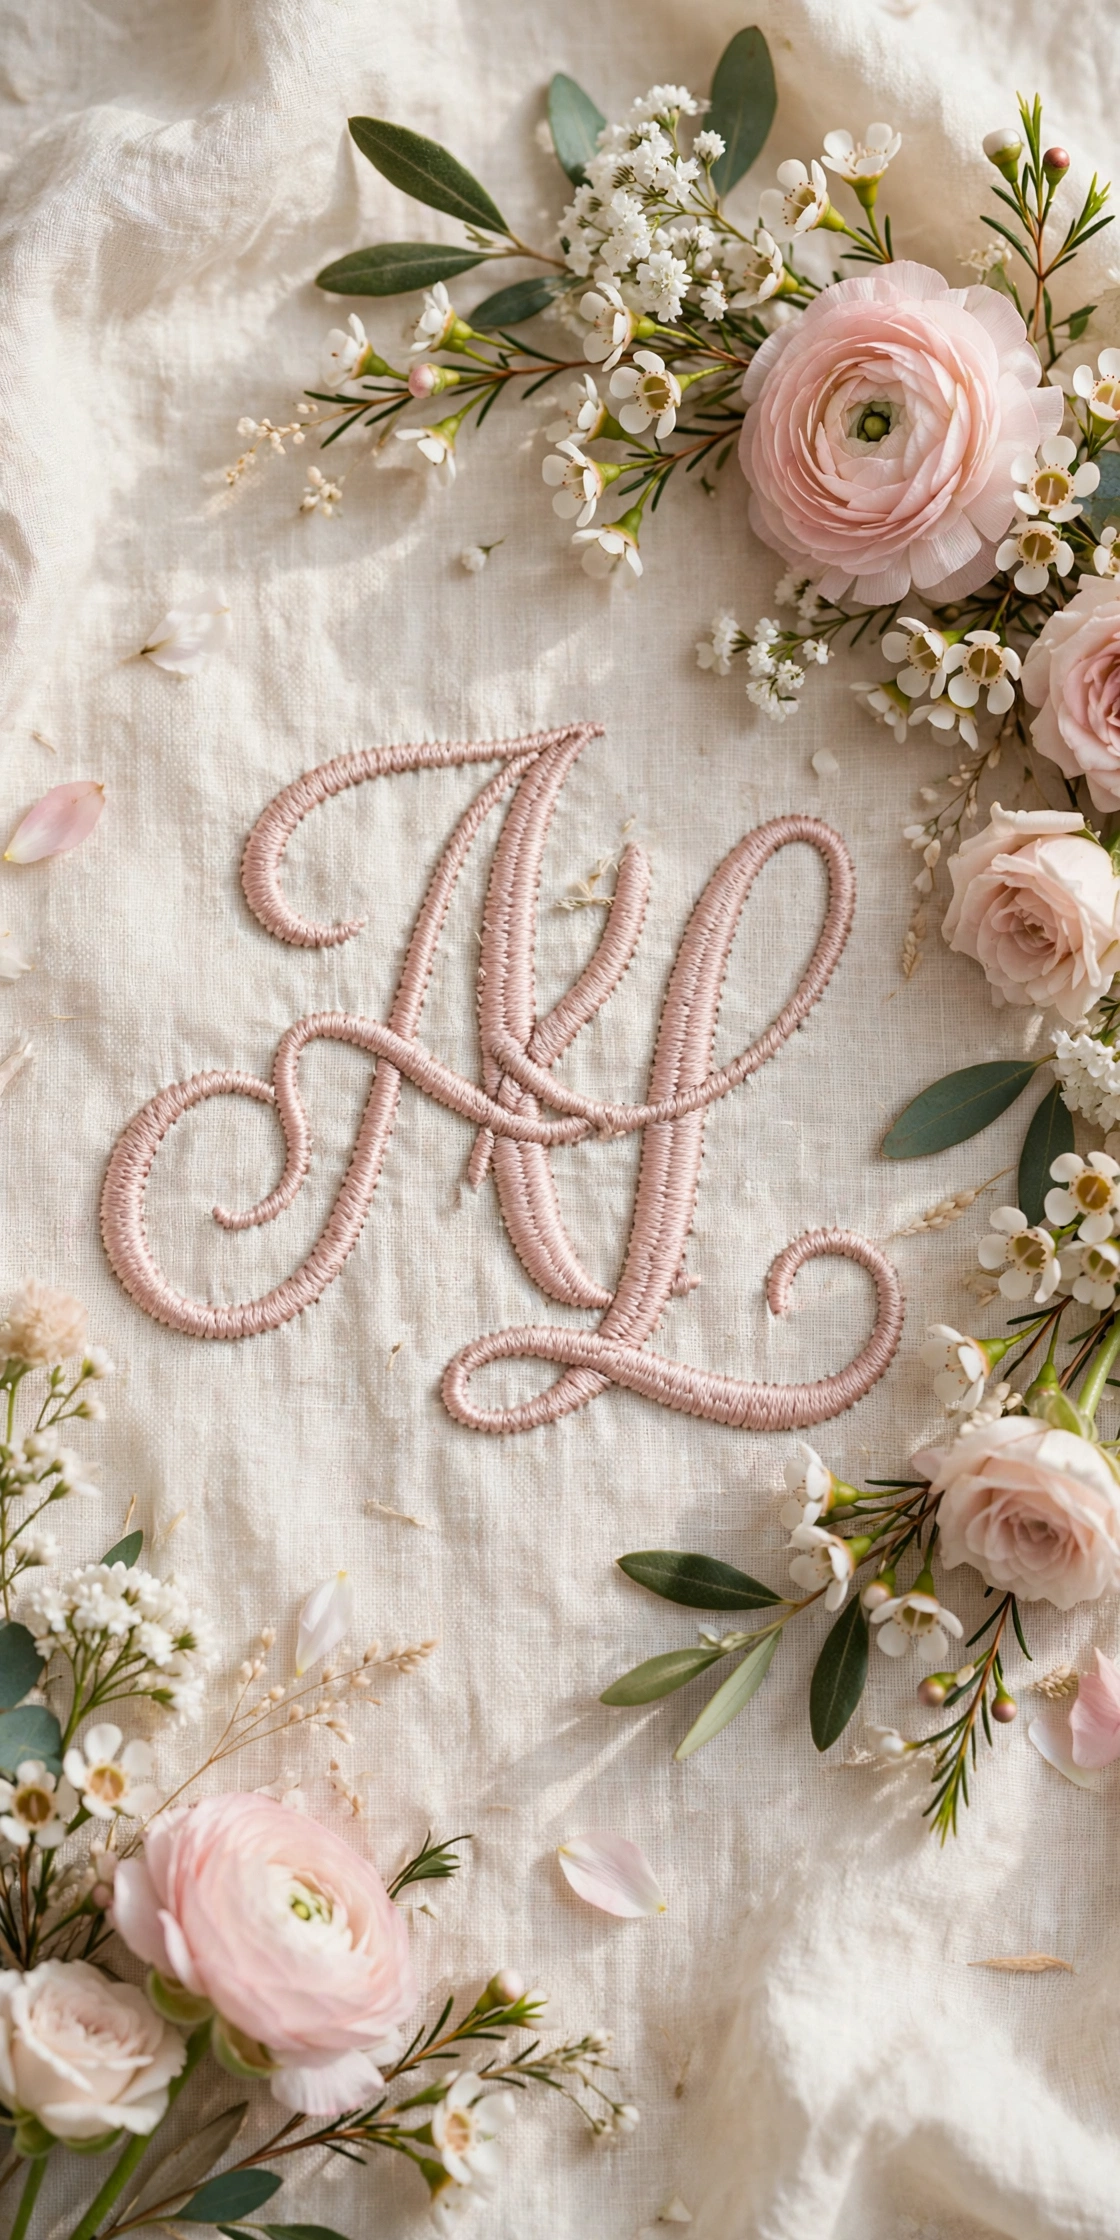
Intertwine two initials for a wedding or anniversary gift, with one shared floral spray joining them at the center. Stitch both letters in back stitch on cream linen, then bridge the gap with white and blush roses, small daisies, and green leaves. Keep both letters the same size and weight so neither name dominates the piece. A 7 inch hoop gives two letters room without crowding.
Try this: sketch the overlap on paper first, since intertwined letters are hard to fix once stitched.
Cost: $$ | Difficulty: Moderate | Time: 4 hours
15. Baby name first letter hoop
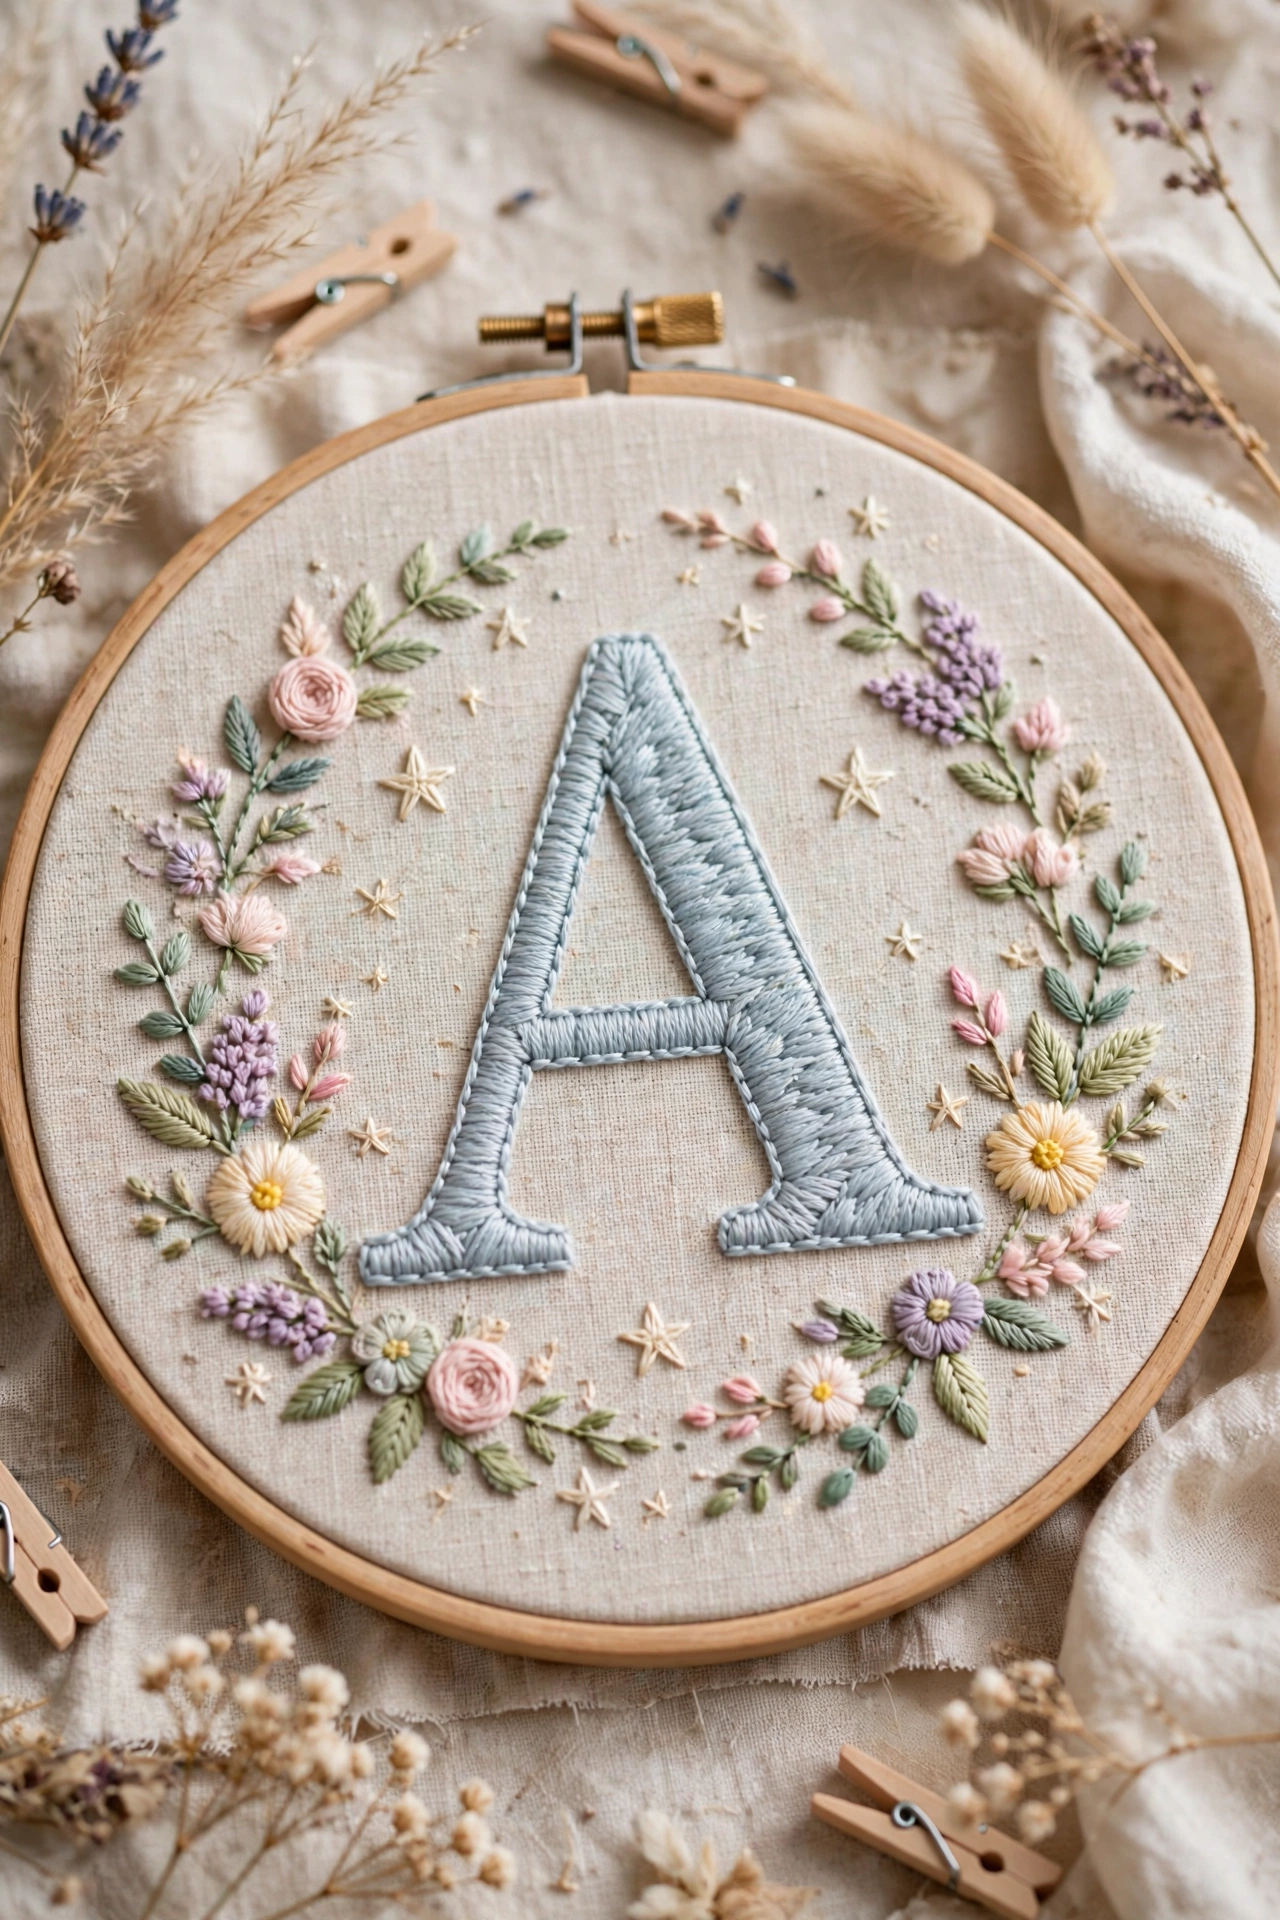
Make one large initial for a nursery wall, with small pastel flowers and tiny stitched stars around its edges. Use soft yellow, mint, and peach floss on white cotton, and keep every flower smaller than a thumbnail so the letter stays the star of the hoop. Stitch the letter in satin stitch for a smooth, padded look that reads well from a crib across the room. Skip beads, buttons, and loose embellishments on nursery pieces.
Try this: add the stars last, one at each corner of the hoop, to balance the design.
Cost: $ | Difficulty: Easy | Time: 3 hours
16. Butterfly and bloom letter
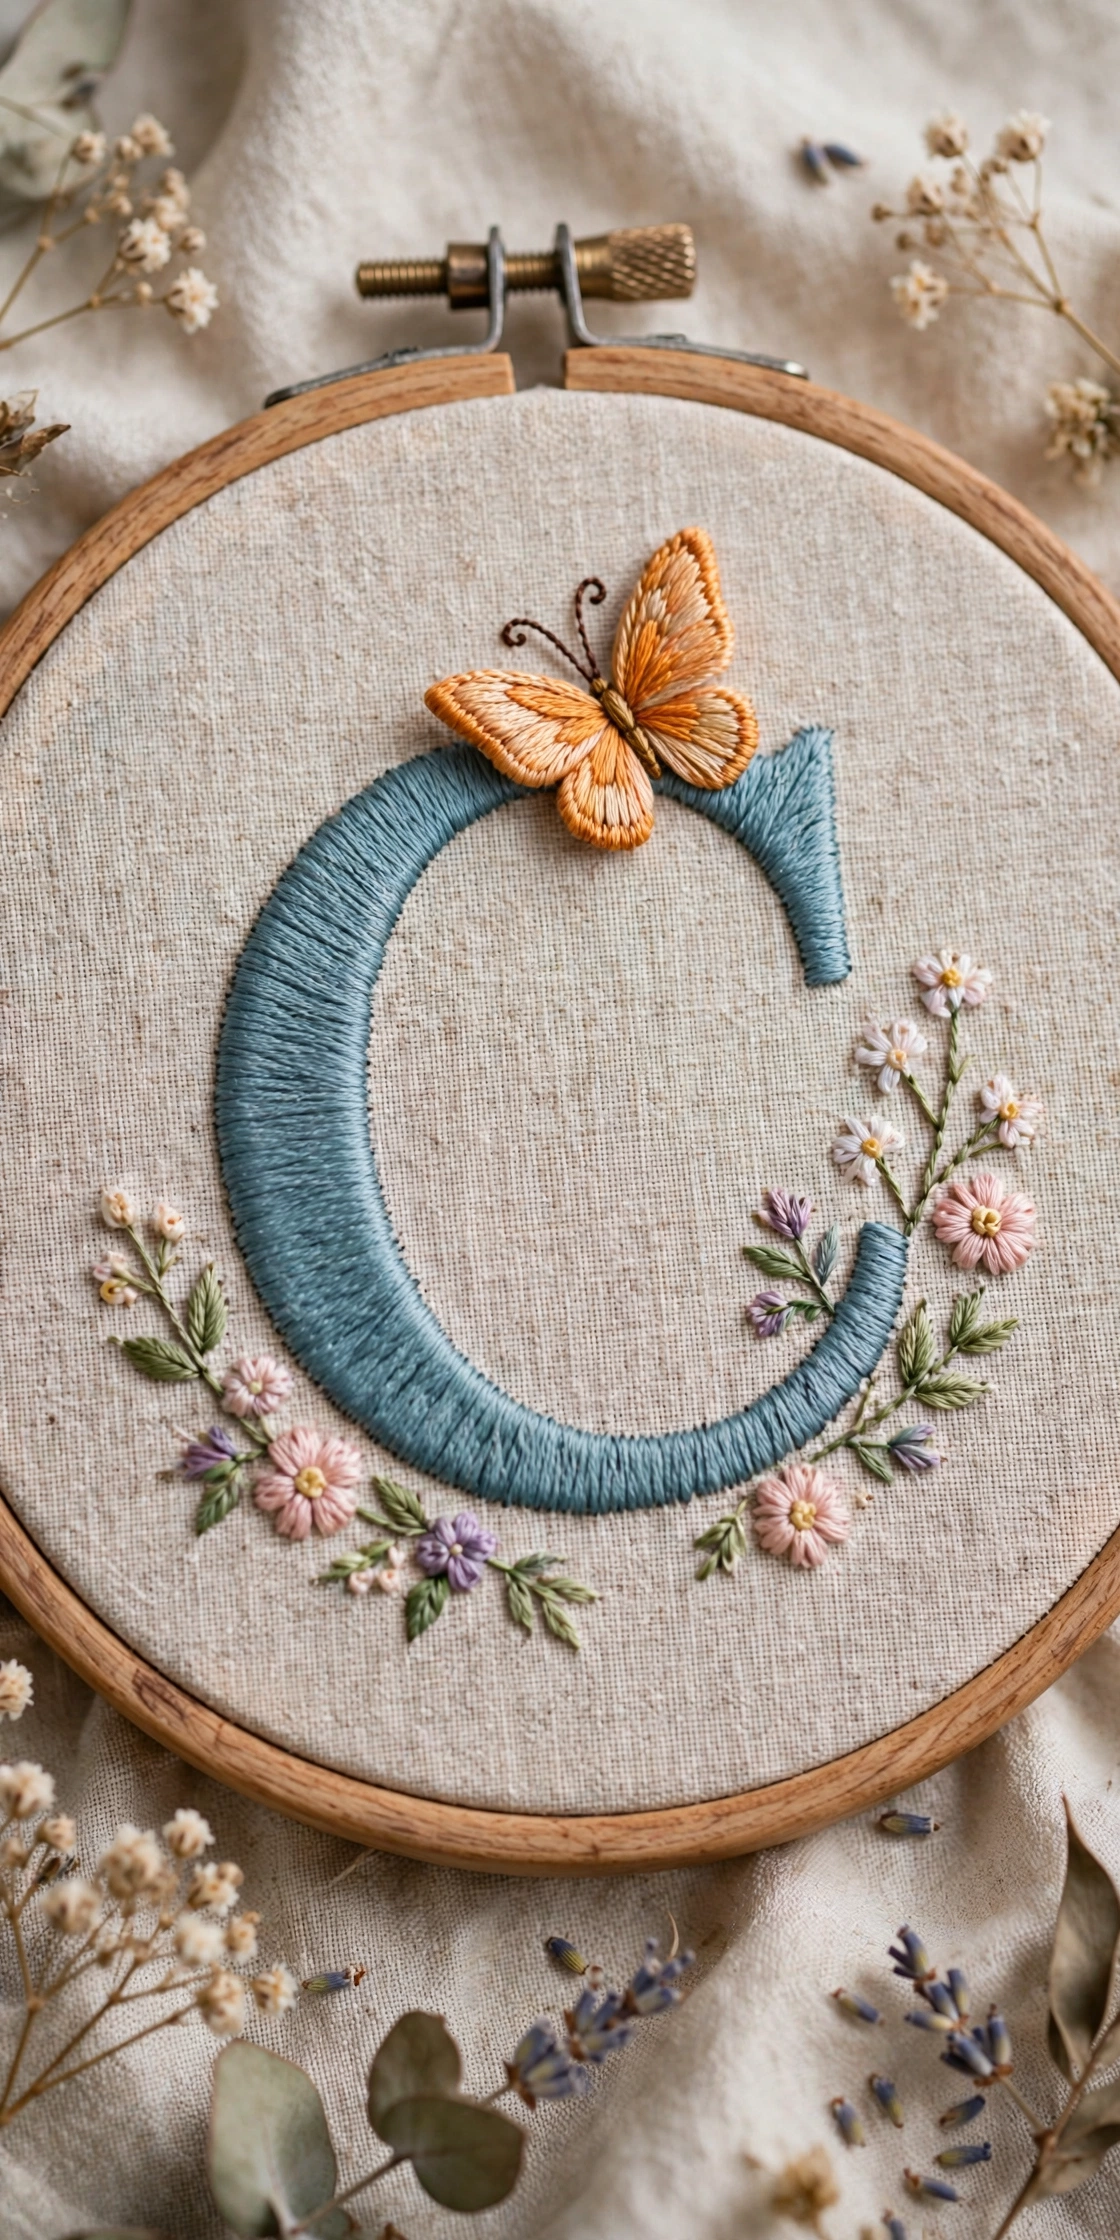
Rest a small butterfly on the upper curve of a floral letter, with its wings in satin stitch and its body in back stitch. Keep the butterfly about one quarter the height of the letter so it reads as an accent, not a second subject. Two wing colors, such as dusty blue and white, plus dark thread for the body and antennae, complete the insect. Place two or three small flowers below it so the butterfly looks landed, not floating.
Try this: stitch the lower wings first, then the upper wings, so the body covers the join.
Cost: $ | Difficulty: Moderate | Time: 3 hours
17. Herb garden letter
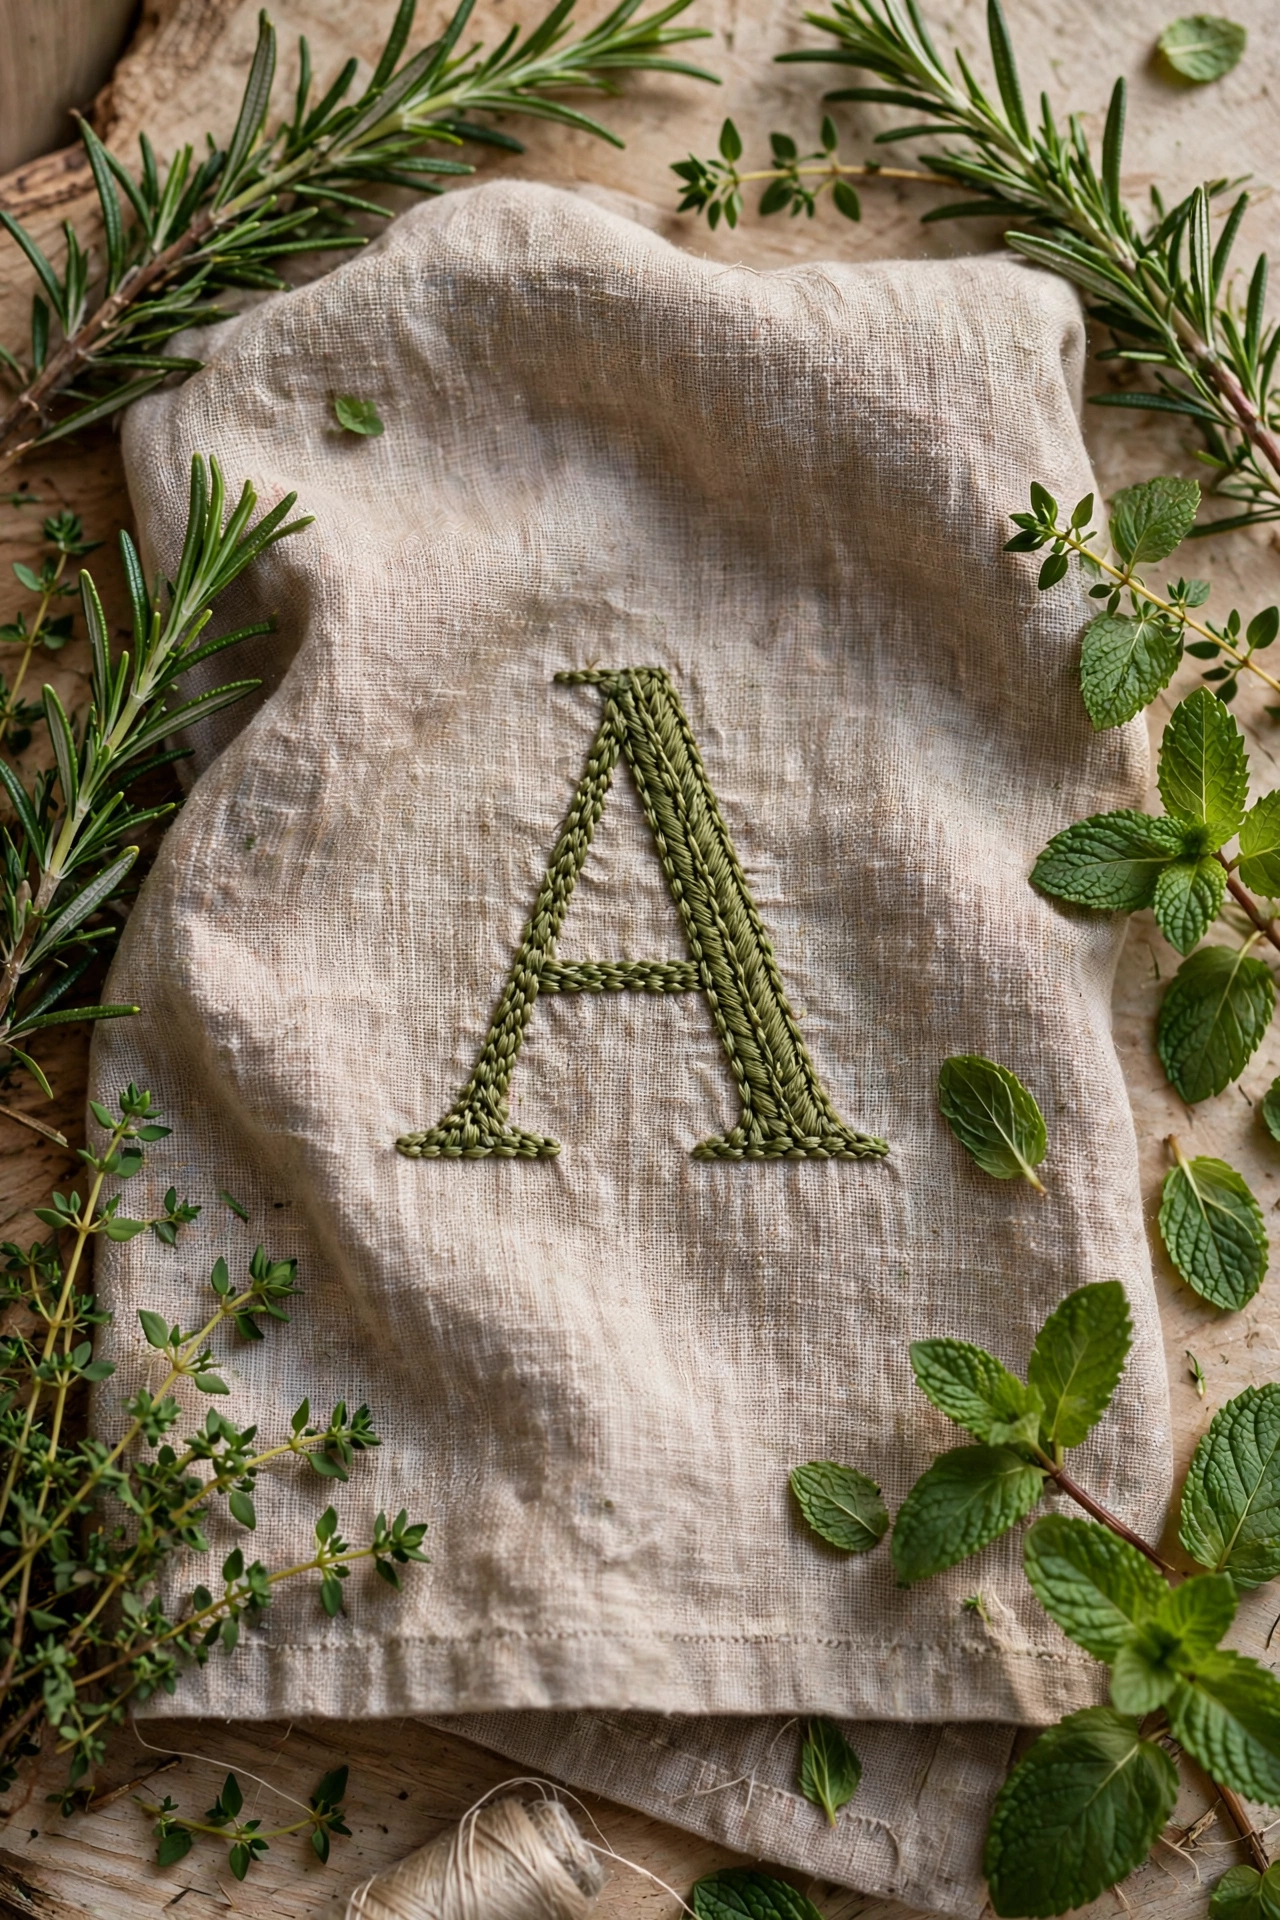
Stitch rosemary, thyme, and mint sprigs around a letter on a linen tea towel for a kitchen gift that gets used daily. Rosemary reads as a straight stem with short straight stitch needles angled off both sides, thyme as a thin stem with tiny leaf pairs, and mint as rounded satin stitch leaves. Green only thread keeps the towel looking fresh after washing. Wash the towel cold and air dry it to protect the stitches.
Try this: place the letter in one corner of the towel so the center stays clear for drying dishes.
Cost: $ | Difficulty: Easy | Time: 2.5 hours
18. Bold satin outline letter with flower crown
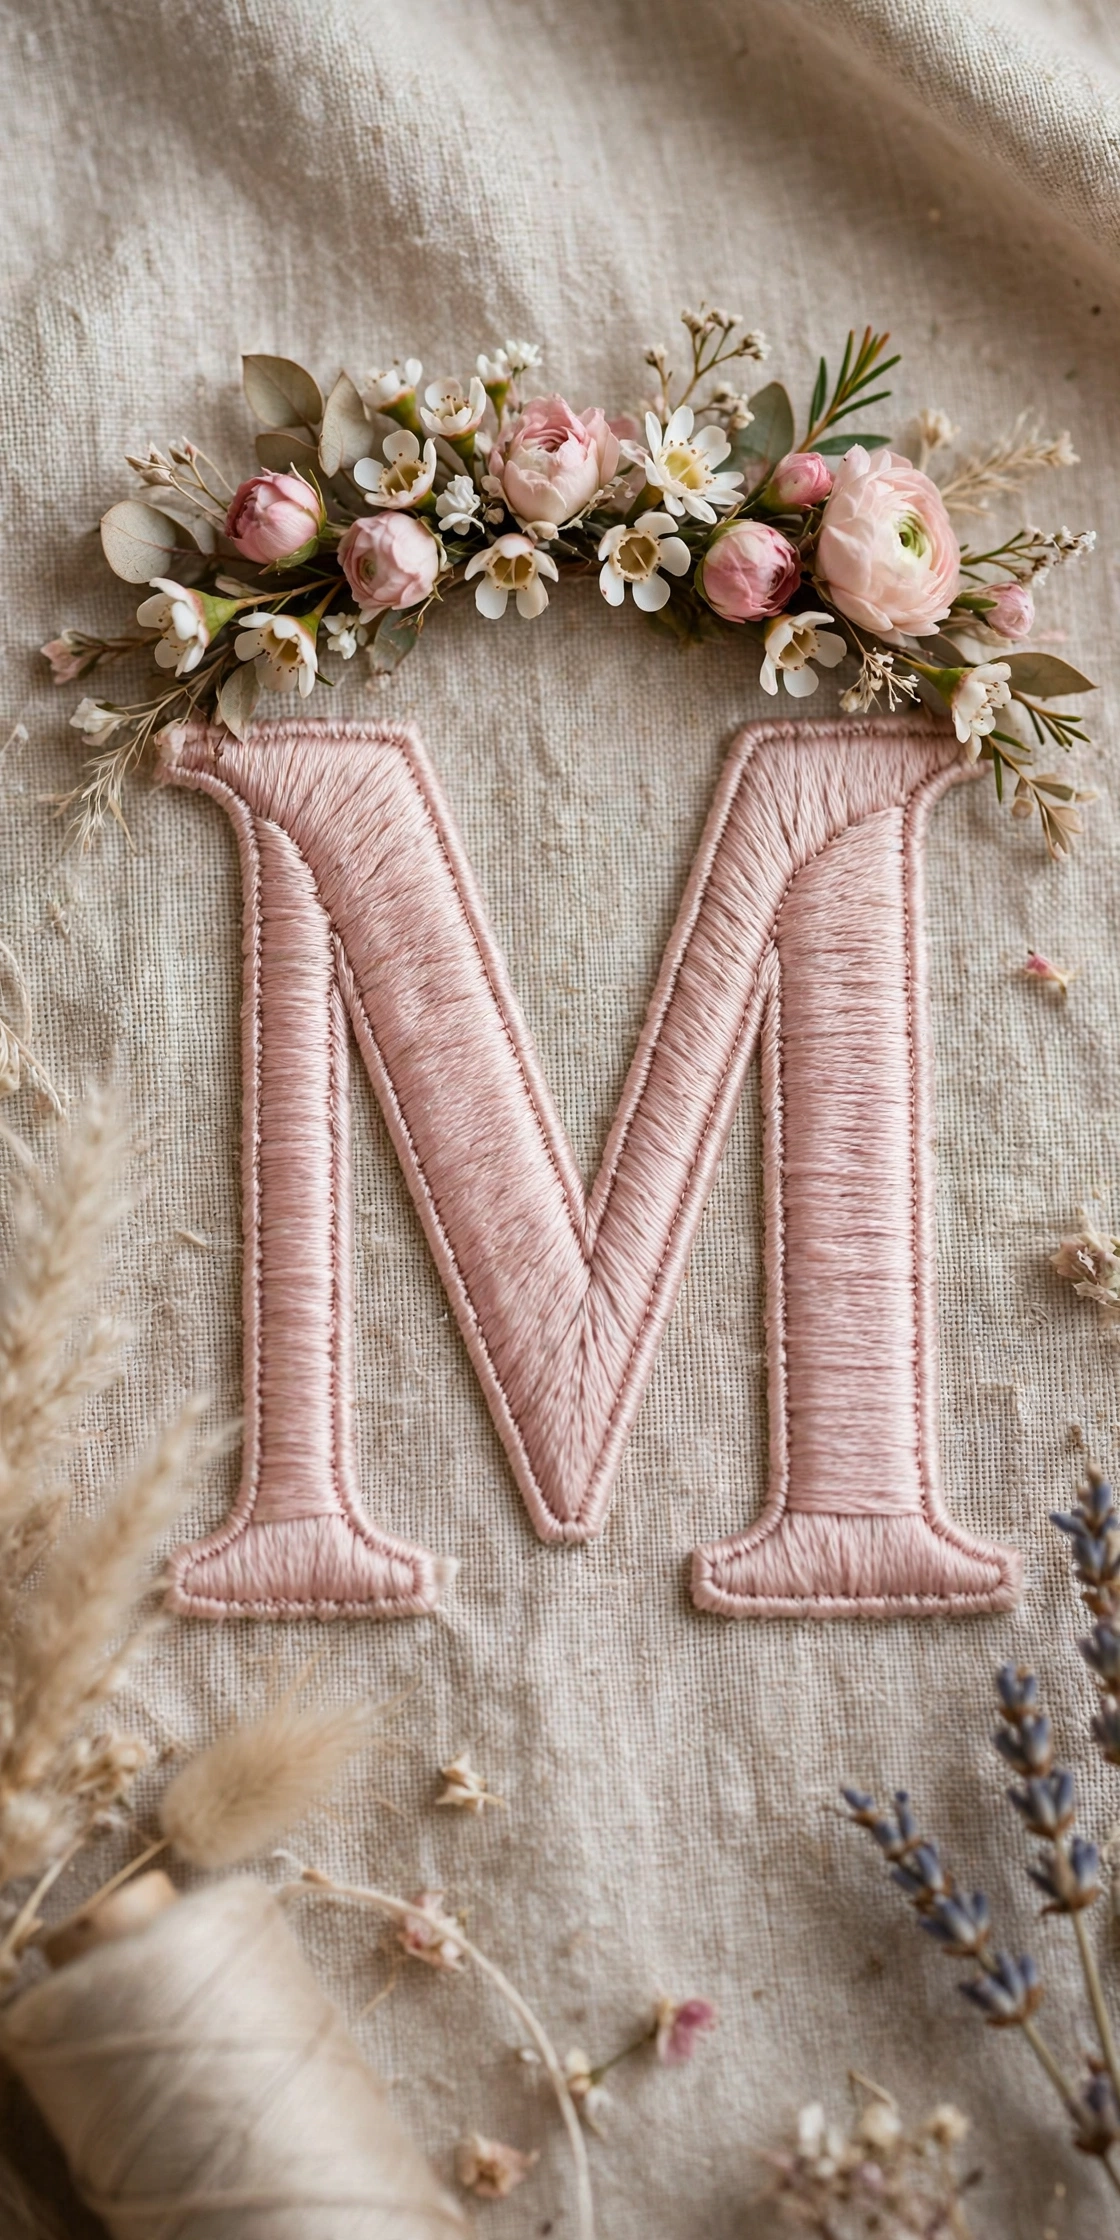
Give the letter a thick satin stitch outline, then crown its top curve with a row of small pink and white flowers. Satin stitch fills the outline with long, close stitches that catch light and make the letter look padded. The crown holds five blooms: three lazy daisy flowers and two French knot clusters, with two leaves tucked behind. A bold outline suits short names and single initials on wall hoops.
Try this: keep your satin stitches the same length and angle so the outline edge stays smooth.
Cost: $ | Difficulty: Moderate | Time: 3.5 hours
19. Floral initial tote pocket
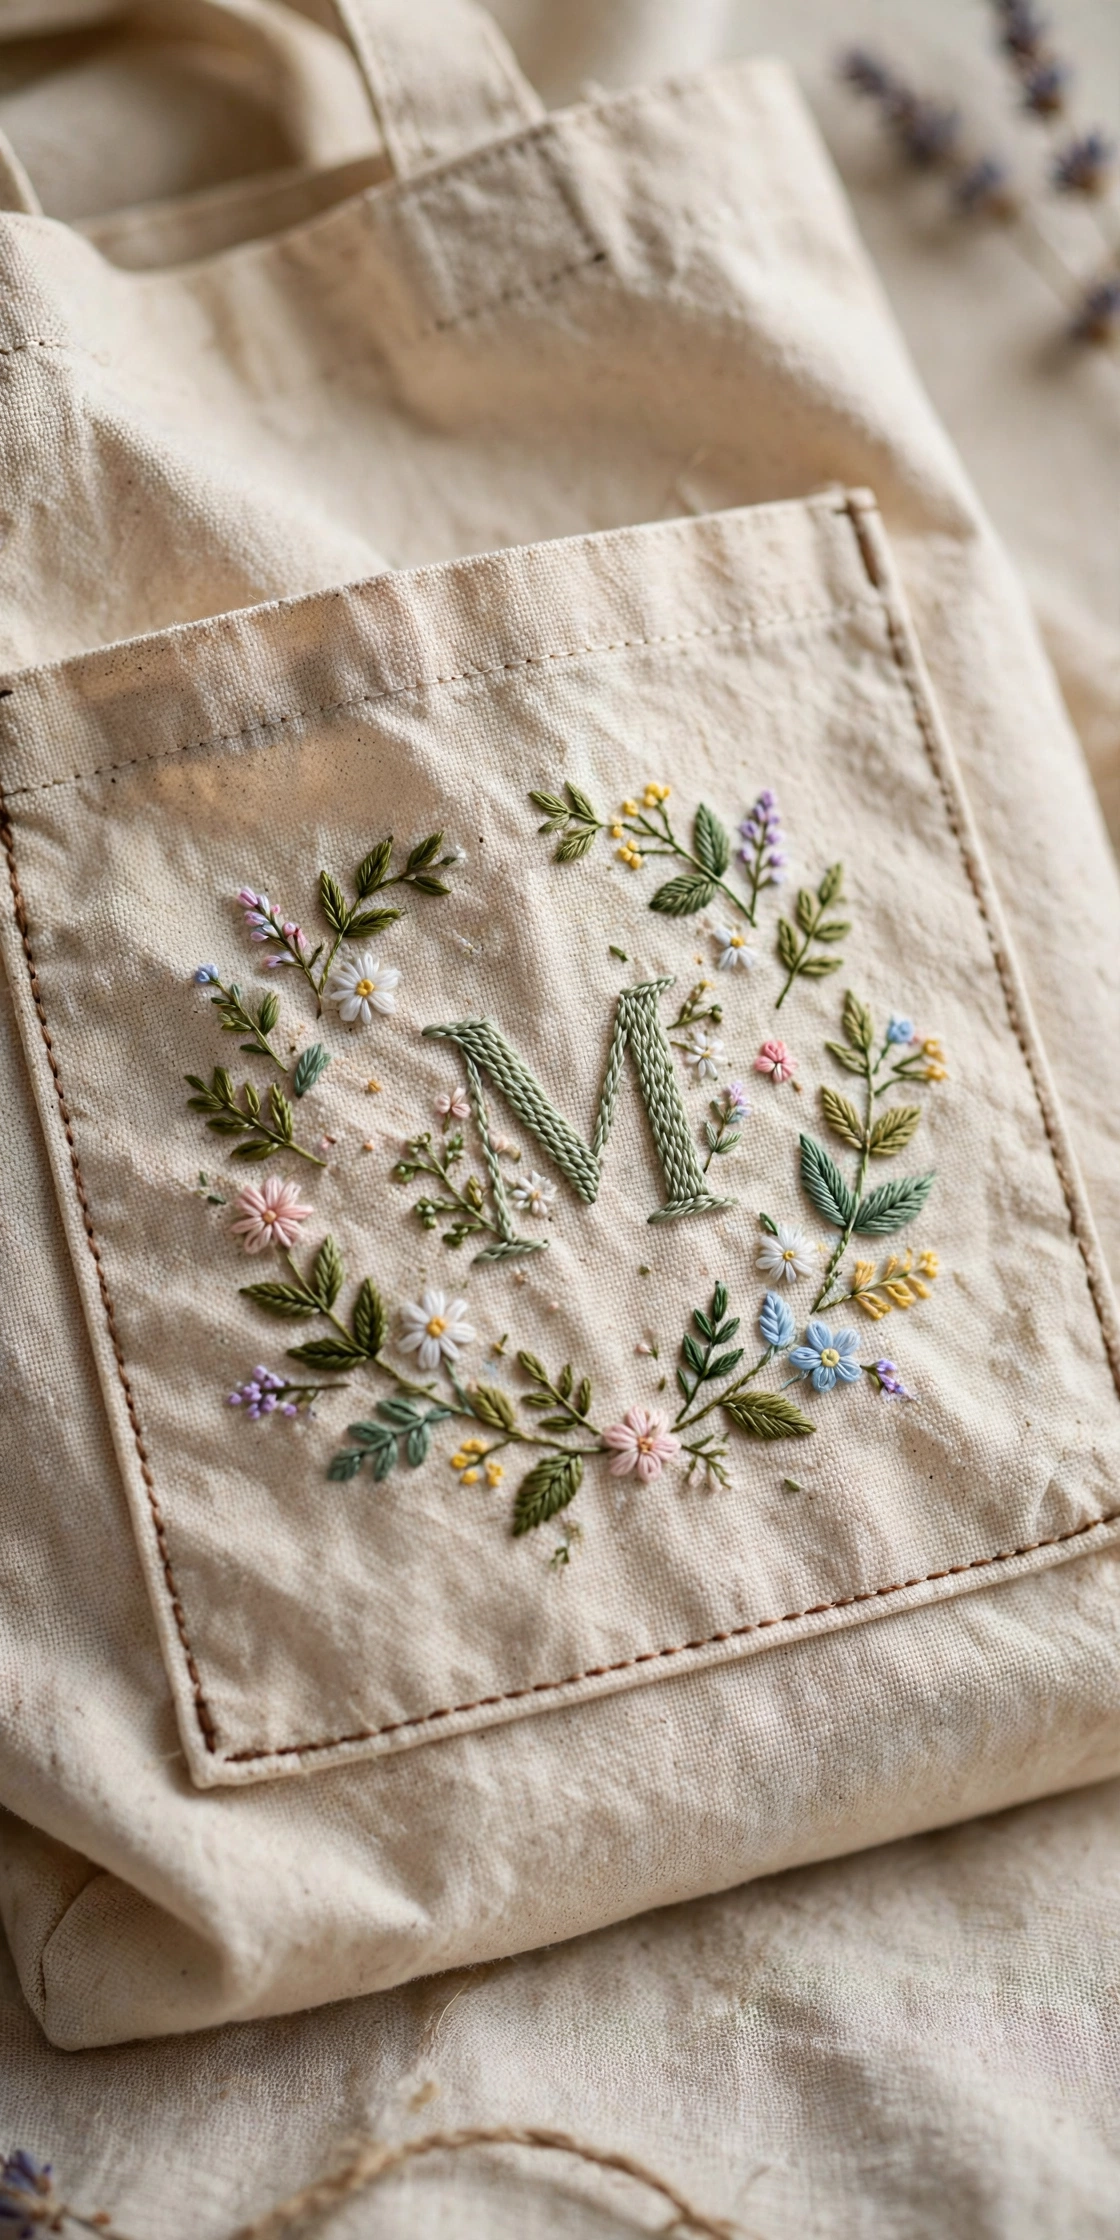
Stitch a small floral initial on the front pocket of a plain canvas tote for a bag that carries its owner initial everywhere. Work on the pocket before sewing it to the bag if you can, since flat fabric stitches faster than a finished pocket. Use a small block letter with two daisies and three leaves, all in 3 strands so the design survives daily use. Back the stitching with iron on interfacing to stop the pocket lining from snagging.
Try this: trace the design on the pocket with the bag standing upright so the letter sits straight when carried.
Cost: $$ | Difficulty: Moderate | Time: 3 hours
How the designs compare
Use this table to match a design to your time, budget, and skill. Every project below uses only the five core stitches plus fishbone leaf or woven wheel where noted.
| Design | Cost | Difficulty | Time | Best for |
|---|---|---|---|---|
| Daisy chain initial | $ | Easy | 2 hours | First hoop |
| Wildflower meadow letter | $ | Easy | 2.5 hours | Forgiving first project |
| Rose vine script letter | $ | Moderate | 4 hours | Romantic wall art |
| Lavender sprig monogram | $ | Easy | 2 hours | Calm gifts |
| Fern and eucalyptus letter | $ | Easy | 2 hours | Green only decor |
| Sunflower corner letter | $ | Easy | 2.5 hours | Bold single flower |
| Birth flower initial | $ | Easy | 2.5 hours | Birthday gifts |
| Tiny bouquet letter | $ | Easy | 2 hours | Small frame gifts |
| Wreath ring letter | $$ | Moderate | 4 hours | Statement wall hoop |
| Trailing ivy letter | $ | Easy | 2 hours | Quick green project |
| Pastel spring letter | $ | Easy | 2.5 hours | Spring decor |
| Autumn leaf letter | $ | Easy | 2.5 hours | Seasonal display |
| Daisy confetti filled letter | $ | Moderate | 3.5 hours | Bold flower shape |
| Two-letter wedding monogram | $$ | Moderate | 4 hours | Wedding gifts |
| Baby name first letter hoop | $ | Easy | 3 hours | Nursery wall |
| Butterfly and bloom letter | $ | Moderate | 3 hours | Nature lovers |
| Herb garden letter | $ | Easy | 2.5 hours | Kitchen gifts |
| Bold satin outline letter with flower crown | $ | Moderate | 3.5 hours | Padded wall art |
| Floral initial tote pocket | $$ | Moderate | 3 hours | Everyday carry |
Cost key: $ means $1 to $10, $$ means $11 to $99, $$$ means $100 to $999, $$$$ means $1,000 and up. Most designs need 3 to 6 skeins of floss, one hoop, and a fat quarter of linen or cotton.
Mistakes to avoid
Stitching the flowers before the letter tops the list, because a crowded design leaves no room to fix a crooked outline. Pulling thread too tight ranks second: tight stitches pucker the fabric and shrink the hoop area, so keep tension even and let the thread lie flat. Skipping a scrap test causes the third common failure, since water-soluble pen lines can survive on some fabrics or vanish on others. Test your pen, your transfer paper, and your stitch tension on the same fabric you plan to frame. Finally, mixing more than four flower colors in one hoop turns a letter into noise, so hold the palette to three blooms plus one green.
Safety notes
Keep needles, pins, and small scissors out of reach of babies and toddlers, and store works in progress where small hands cannot reach them. Use a thimble when pushing a needle through heavy canvas or layered fabric, and stitch in good light to avoid eye strain and slipped stitches. For nursery pieces, skip beads, buttons, and glued embellishments entirely, and keep loose threads trimmed short, since small parts and cords near a crib create hazards. The American Academy of Pediatrics choking prevention guide lists small household items to keep away from infants and young children, and it is worth a read before stitching gifts for a baby’s room. Wash finished pieces gently by hand in cold water, air dry them flat, and press from the back so stitches keep their shape.
For stitching safety basics and child-safe finishing, see the American Academy of Pediatrics choking prevention guide. For embroidery education and study resources from the national guild, see the Embroiderers’ Guild of America study boxes.
Related reading
If you want more sewing gift ideas that pair with a floral letter, start with our sewing gift roundup for monogram and personal touches you can add to any handmade present. For 15 Thoughtful DIY Sewing Gifts for Friends That Feel Personal, Not Store-Bought, you will find a monogrammed zipper pouch and other personalized projects.
When your hoop is finished and needs a wall, our home decor roundup has display ideas for handmade pieces. For 30 Creative DIY Home Decor Ideas for 2026 for a Home That Feels Like You, you will find gallery walls and shelf styling that suit embroidery hoops.
Hoop art hangs well in a relaxed, layered room, and our boho wall decor ideas show how to mix textures without clutter. For 15 DIY Boho Wall Decor Ideas to Make Your Home Feel Cozy, you will find hoop fabric art and gallery wall layouts.
If the letter is a baby gift, our baby gift roundups help you pair it with keepsakes parents keep. For 20 Creative Baby Boy Gifts to Make at Home That Parents Will Keep, you will find handmade nursery gifts that match a first letter hoop.
For shower gifts in general, our shower gift guide covers practical presents that still feel personal. For 15 Best Baby Gift Ideas for Showers That Parents Will Actually Use, you will find blankets, keepsakes, and other gifts that pair with stitched letters.
Frequently asked questions
What fabric works best for floral alphabet embroidery?
Tightly woven cotton or linen works best, since both hold stitches without stretching and show pen transfer lines clearly. Avoid stretchy knits and loose weaves, which distort letters as you stitch. Wash and press your fabric before starting so later washing does not shrink the finished piece around the stitches.
Which stitches do beginners need for floral letters?
Five stitches cover nearly every floral letter: back stitch for outlines, lazy daisy for petals, French knots for flower centers and buds, stem stitch for stems and vines, and satin stitch for filled leaves and bold outlines. Fishbone stitch adds realistic leaves, and woven wheel makes puffy roses, but both are optional extras once the core five feel comfortable.
How do I transfer a letter pattern to fabric?
Print the letter at hoop size, then trace it with a water-soluble pen on light fabric or chalk transfer paper on dark fabric. A bright window or lightbox helps the lines show through the cloth. Test your marking method on scrap fabric first, and keep handling light after transfer so chalk lines do not wear off before you stitch.
How do I keep the letter readable under the flowers?
Stitch the letter outline first, then place flowers at the edges, base, or one corner only, leaving the middle of the letter bare. Limit the palette to three flower colors plus one green, and keep flowers smaller than the letter strokes are wide. Step back every few minutes and check the shape from arm’s length, since a design that reads up close can blur from across the room.
How do I wash and finish an embroidery hoop?
Hand wash the finished piece gently in cold water with mild soap, then air dry it flat and press from the back with a warm iron. Trim the fabric to about an inch beyond the hoop, fold it to the back, and cover the back with a felt circle glued or stitched in place. Hang finished hoops out of strong direct sun so floss colors stay bright.
Final thoughts
Pick one letter, one hoop, and one flower style, and let the first finished piece teach you the rest. A readable letter with a few well placed blooms beats a crowded hoop every time, and the second letter always stitches faster than the first.
For common beginner hand embroidery mistakes, see our guide to 10 Common Beginner Hand Embroidery Mistakes, From Puckered Fabric to Tangled Floss for pulling stitches too tight and cutting thread too long to skipping the hoop and using the wrong needle, with a fix for each.
For beautiful hand embroidery letters ideas, see our guide to 10 Beautiful Hand Embroidery Letters Ideas, From Satin Block Initials to Goldwork Monograms for satin-filled block initials and chain stitch script words to goldwork monograms and cross stitch samplers, with costs, difficulty, and time for each.
For hand embroidery stitches every beginner must learn, see our guide to 10 Hand Embroidery Stitches Every Beginner Must Learn, From Running Stitch to French Knots for running stitch and backstitch to satin stitch and French knots, with steps, costs, difficulty, and time for each.
For stunning hand beaded embroidery ideas, see our guide to 23 Stunning Hand Beaded Embroidery Ideas, From Lavender Sprigs to Moon Phases for lavender sprigs and moon phases to koi fish and coral reefs, with materials, costs, difficulty, and time for each project.
Love stitched flowers? See these 19 flower embroidery designs for thread-only floral motifs, from woven roses to wildflower borders.


