
By Emma Wilson · Updated October 13, 2026
My entryway wall sat blank for a year because every piece of art I loved cost more than my weekly grocery run. I tried framed prints instead, and they looked flat against the wall, like something was still missing. The problem was never the frame. It was the dimension.
This guide gives you 10 easy DIY 3D wall art ideas that add real depth and texture to a room, most for under $20 and each with a difficulty and cost label so you can pick your weekend project with confidence. I started with the paper butterflies on my hallway wall, and two years later they still get compliments. You will also find how to hang every piece safely, including the heavy ones.
Quick takeaways
- 3D wall art builds depth with layers, folds, and texture, not expensive materials. Most projects cost under $20.
- Foam spacers, shadowbox frames, and palette-knife texture are the three tricks that make flat builds look dimensional.
- Lightweight pieces can hang on rated adhesive mounting tape. Heavy pieces (wood cubes, metal) need screws in studs or drywall anchors.
- Every idea below takes an afternoon or less and includes a difficulty and cost label.
- New to this? Start with the paper 3D sculptures, the hexagon tiles, or the spackle canvas.
Hang it right: the 5-minute wall check
3D art is heavier than a framed print, so pick your hanger by weight. Lightweight pieces (paper, fabric, foam tiles) can go up with heavy-duty adhesive mounting tape used within its rated limit; the manufacturer Gorilla Tough rates its heavy-duty mounting tape up to 30 pounds, and it works on smooth and rough surfaces. Test any adhesive on a hidden spot first, because tape can pull paint off the wall when removed. There is no truly damage-free option where adhesives are used.
Heavier pieces (wood cubes, metal sculpture, layered MDF) need screws. Drive them into studs when you can find them with a stud finder; otherwise use rated drywall anchors and a level so the piece sits straight. A french cleat gives the strongest hold for wide panels. If your home was built before 1978, check the EPA’s lead paint guidance before sanding or drilling old painted walls. Wear cut-resistant gloves when folding thin metal sheets, and keep hot glue guns away from small children.
1. Layered Geometric Wall Art

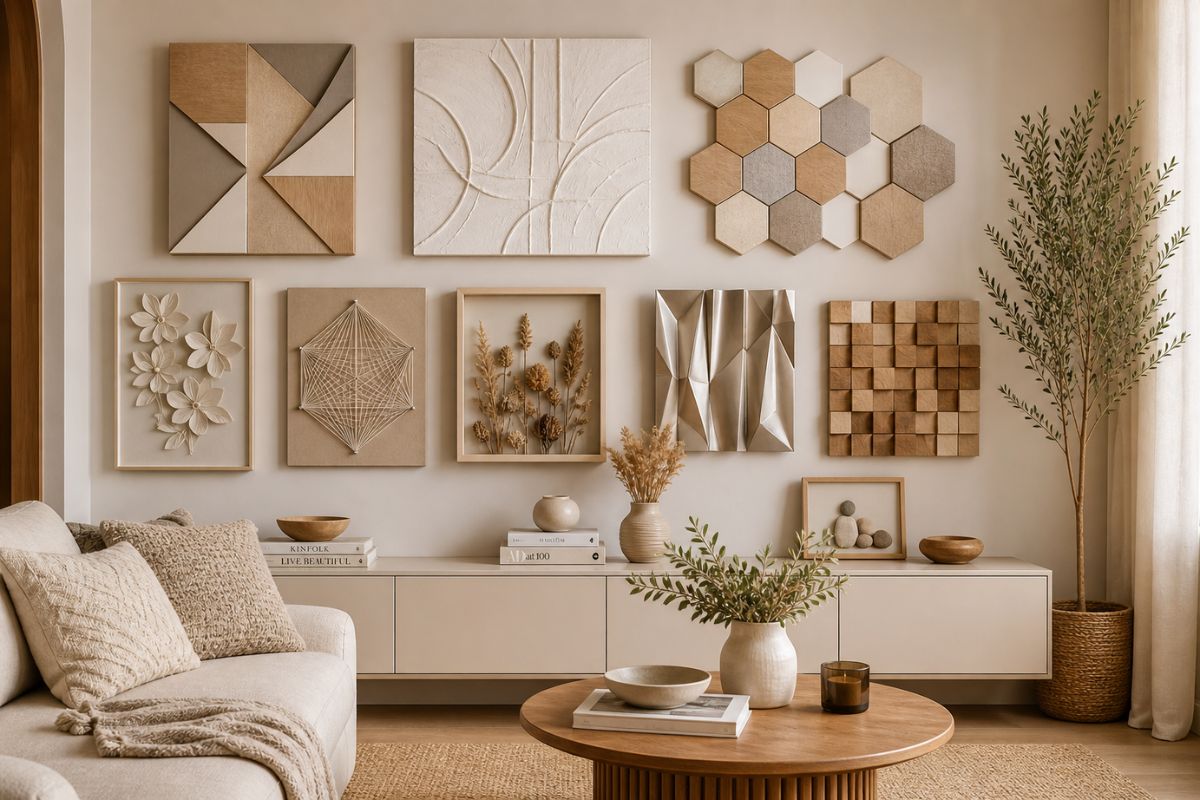
Start with the most forgiving project. Cut triangles, arches, and half-circles from MDF board or heavy cardboard, each piece 6 to 8 inches wide. Paint them in three matte shades, like warm white, clay, and deep navy, then glue them onto a 24 by 36 inch backing board. Slip foam spacers between pieces for real shadows. The spacers are the whole trick: without them, the design reads flat. The finished panel is heavy, so hang it with two screws into studs or wall anchors. For more dimensional trim work, these wall molding ideas use the same layered look built straight onto the wall.
Try this: paint the backing board the same color as your wall so the shapes look like they float.
Easy · Under $15 · 2 hours
2. Paper 3D Wall Sculptures

Butterflies made this project famous, and the method works for flowers, leaves, and abstract waves too. Cut 40 to 60 shapes from 300gsm cardstock, fold each one down the middle so the wings lift, and stick them to a painted canvas with foam adhesive dots. Arrange the pieces in an ombre sweep, darkest at one corner fading to light, The movement costs almost nothing. Keep paper art out of bathrooms and kitchens; steam and cooking grease curl the folds within months. This one is light enough for adhesive mounting strips. Kids who love cutting and folding can try these paper wall decoration ideas next.
Try this: cut two sizes of the same shape and layer small over large for double the depth.
Easy · Under $10 · 3 hours
3. String Art Designs

A hammer, a board, and one spool of yarn are all this takes. Tape a printed mountain, arch, or sun template onto a 12 by 16 inch pine board and hammer nails along the outline, half an inch apart. Pull the template off, tie embroidery floss or cotton yarn to one nail, and weave it across the pattern until the shape fills in. Two tones of the same color look more expensive than a rainbow of threads. Sand the board first so paint goes on evenly. Hang it on one nail or screw; the board is light but the nails add weight.
Try this: wrap the string tighter at the edges and looser in the middle for a soft gradient fill.
Easy · Under $10 · 2 hours
4. Textured Canvas Art (Spackle Art)

This is the viral one for a reason: it looks like a gallery piece and costs less than lunch. Spread premixed joint compound over a 16 by 20 inch canvas with a 3-inch palette knife, building it about a quarter inch thick. Drag the knife through it to carve arches or waves, then let it dry a full 24 hours; thick spots crack if you rush them. Paint the whole thing one warm white or soft beige so the shadows do the talking. Hang it like any canvas, on one or two nails, since the dried compound adds only a little weight.
Try this: sketch the arch layout in pencil on the dry canvas before you spread the compound.
Easy · Under $15 · 2 sessions
5. Shadow Box Nature Art

If you press flowers into books, this gives them a permanent home. Pick an 8 by 10 inch shadowbox frame at least 2 inches deep and arrange dried eucalyptus, lavender sprigs, or small branches inside by height, tallest at the back. Glue each stem to the backing board with hot glue so nothing shifts when the frame hangs. Use only fully dried plants; fresh stems release moisture inside the glass and grow mold within weeks. The glass front keeps dust off, which makes this the lowest-maintenance idea on the list. It hangs on a single nail like a picture frame.
Try this: paint the inside of the backing board charcoal so pale dried flowers stand out.
Easy · Under $20 · 1 hour
6. Metal Sheet Wall Sculpture

Sharp edges, serious payoff. Buy a roll of 26-gauge aluminum flashing at the hardware store, cut it into strips with tin snips, and fold each strip into ridges or waves. Join the folded pieces with small rivets or metal adhesive, then mount the sculpture on a plywood backing for stability. The industrial look suits entryways and home offices, and a coat of matte black spray paint makes it read far more expensive. Wear cut-resistant gloves the whole time; flashing edges slice skin easily. This one is heavy, so hang the backing with screws into studs or rated anchors, never adhesive strips.
Try this: fold every ridge to the same angle using a metal ruler as a guide for a clean, even pattern.
Medium · Under $25 · 3 hours
7. Hexagon Wall Tiles

Math class meets wall decor, and renters love this one. Buy precut 4-inch foam or lightweight wood hexagons, about 20 for a 3-foot-wide cluster, and paint them in five graduated shades of one color, like pale sage deepening to forest green. Arrange them in a honeycomb on the floor first, leaving quarter-inch gaps, then transfer the layout to the wall with small pieces of mounting tape. Foam tiles are light enough for adhesive strips, which makes this the easiest idea to remove later. Photograph the floor layout before you start sticking; it saves a lot of repositioning.
Try this: scatter three or four loose hexagons off the main cluster edge for an organic, unfinished feel.
Easy · Under $15 · 2 hours
8. Wooden Cube Wall Art

Thirty-six identical cubes become a piece people assume you bought. Glue 2-inch wood cubes onto a 24 by 24 inch plywood backing in a tight grid, alternating walnut stain and natural finish for contrast, or painting every cube the same deep charcoal for a modern block. Let the wood glue cure overnight before anyone lifts the panel; a cube that pops off later leaves an obvious hole in the pattern. This is the heaviest project here, so hang the backing on screws driven into studs or a french cleat. Sand each cube lightly so stain absorbs evenly.
Try this: leave a few cubes out of the grid in a scattered pattern for a deconstructed look.
Medium · Under $30 · 3 hours
9. Woven Fabric Panels

Leftover fabric scraps become the softest art on this list. Stretch jute twine vertically across an old picture frame to make the warp, then weave 1-inch-wide cotton strips over and under in earthy tones like rust, cream, and olive. Knot the ends or leave them as fringe along the bottom edge; both look intentional. Keep the weave snug but not tight, because pulling too hard bows the frame inward. This piece weighs almost nothing, so adhesive strips or a single nail both work. For the full textured-wall look, these DIY boho wall decor ideas pair woven pieces with baskets and macrame.
Try this: weave in one metallic gold strip; a single shine line lifts the whole panel.
Easy · Under $10 · 2 hours
10. Pebble Frame Art

The beach souvenir that finally earns its keep. Sort flat pebbles 1 to 2 inches wide and arrange them into a simple design, a heart, a tree, or a house, on a burlap-covered backing inside an 11 by 14 inch shadowbox frame. Hot glue holds each stone; press and hold for ten seconds, since cold stones cool glue fast and weak bonds drop pebbles later. Wash the pebbles first and let them dry fully, or the glue sticks to grit instead of stone. The finished frame is heavier than it looks, so use two hooks or a wire hanger, not a single adhesive strip.
Try this: paint a few pebbles white and dot them through the design like highlights.
Easy · Under $10 · 1.5 hours
Which 3D wall art fits your space?
Match the project to your room, your budget, and how much weight your wall can take.
| Idea | Best for | Difficulty | Cost | Time |
|---|---|---|---|---|
| Layered geometric | Modern living rooms | Easy | Under $15 | 2 hours |
| Paper sculptures | Bedrooms, nurseries | Easy | Under $10 | 3 hours |
| String art | Hallways, gifts | Easy | Under $10 | 2 hours |
| Spackle canvas | Minimalist spaces | Easy | Under $15 | 2 sessions |
| Shadow box nature | Cozy corners | Easy | Under $20 | 1 hour |
| Metal sculpture | Entryways, offices | Medium | Under $25 | 3 hours |
| Hexagon tiles | Rentals, accent walls | Easy | Under $15 | 2 hours |
| Wooden cubes | Statement walls | Medium | Under $30 | 3 hours |
| Woven fabric | Bedrooms, reading nooks | Easy | Under $10 | 2 hours |
| Pebble frame | Bathrooms, gifts | Easy | Under $10 | 1.5 hours |
Frequently asked questions
How do I hang 3D wall art without damaging my walls?
Match the hanger to the weight. Lightweight pieces like paper sculptures, fabric panels, and foam hexagon tiles can hang on heavy-duty adhesive mounting tape, as long as you stay within the product’s rated weight limit (Gorilla Tough’s heavy-duty tape, for example, is rated up to 30 pounds). Always test the tape on a hidden spot first, since adhesives can pull paint off when removed. Anything heavy, wood cubes, metal sculpture, layered MDF panels, needs screws driven into studs or rated drywall anchors. If you rent, stick to the lightweight ideas or lean larger pieces on a mantel or shelf instead.
What is the cheapest way to make 3D wall art?
Start with cardboard and paint. The layered geometric project and the paper sculptures both cost under $10 to $15 using materials most craft drawers already hold: cardboard, cardstock, glue, and acrylic paint. Premixed joint compound is the next cheapest upgrade; one small tub covers several spackle canvases. Buy canvases, frames, and wood cubes at dollar or craft stores rather than art supply shops to keep every project in the under-$20 range.
Is spackle art durable enough to keep hanging?
Yes, once it cures fully. Dried joint compound turns rock hard, and a coat of acrylic paint seals the surface against everyday humidity. Give thick areas a full 24 hours to dry so they don’t crack later. Keep spackle art out of steamy bathrooms, and mount larger canvases on two nails or a wire rather than a single hook so the weight spreads evenly. For more renter-safe decorating beyond wall art, these living room decor ideas for renters cover the rest of the room.
How do you keep paper 3D wall art from collecting dust?
Dust paper sculptures once a month with a soft feather duster, working from the top down so you don’t bend the folds. For deeper dust, use a hair dryer on the cool setting held at least a foot away; heat will warp cardstock. Hanging paper art away from kitchens and bathrooms prevents most buildup, since grease and steam make dust stick. A light coat of clear matte spray sealant adds some protection, but test it on a scrap piece first because sealant can darken light-colored paper.
Will these 3D wall art ideas work in a rental?
Most of them will. The paper sculptures, hexagon tiles, woven fabric panels, and string art are all light enough for adhesive mounting strips or a single small nail hole, which most leases allow you to fill at move-out. Skip the heavy hitters, wood cubes and metal sculpture, unless your lease permits anchors. Another safe route is leaning a finished piece on a mantel, dresser, or floating shelf, which needs no wall hardware at all.
Final thoughts
Ten projects, one free weekend, and walls that finally have something to say. Start with the idea that matches your room and your comfort level, hang it properly the first time, and let the compliments roll in. My hallway butterflies are still there two years later, and the entryway wall hasn’t been blank since.